Special Effects 1st Semester Final Assessment – Gelatin Hypertrophic Scaring

GELATIN HYPERTROPHIC SCARING
Our Special Effects final assessment brief we were asked to create a scenario in which someone could harm themselves or others in the college or workplace. The best image would then be picked to illustrate health and safety posters which will be put up around the college  to remind pupils the importance of health and safety precautions. For my final assessment I decided to create a facial hypertrophic scaring as a result of a chemical burn in the science department. I think it would be a very shocking image to have on a poster as self-image is so important to a lot of people and may remind others that accidents do happen. I wanted to apply the make-up  close my model’s eye to show the possibility of damage to the eye if the correct eye protection is not in use when dealing with harmful chemicals.

For a full tutorial on gelatin hypertrophic scaring just click to the following link!  Thanks for reading guys!

https://kathrenelizabethmakeup.wordpress.com/2012/11/26/gelatin-hypertrophic-scaring/

And thanks to my lovely model Tracy Reed 🙂

Katy x

70’s Disco Frogs – College Production (Work Experience)

Recently a few class members and I offered to help out with Bradford College Drama production. We were all put into groups and assigned different characters which we then had to create a theater style make-up in-keeping with that particular character. Myself Tracy Reed and Hannah Todhunter were in charge of the 70’s Disco Frogs in the production on opening night. The make-up was quite simplistic as the art department of Bradford College had already made some amazing ‘froggy’ masks for the cast to wear.
As team leader I took a visit to the art department to take photos of the casts costume before designing the body paint. Gina (one of the creative directors of the play) asked us to create a small but bold frog skin pattern down the arms down each arm as they are likely to be seen on stage due to the costumes and the dance routines.
To save time I decided to create my own stencil for myself and Tracy to use on the frog cast members, I also left the stencil behind for classmates to use the following night for the next production as it was really helpful.

imagesImage source – (http://www.realmagick.com/frog-skin)

Before creating the stencil I carried out some research into how I was going to create a ‘froggy’ skin detail which could be easily transferred onto the skin. Once I had found a realistic looking pattern I then roughly drew it onto a sheet of thick acetate using a permanent marker. I then used a craft knife and cutting matte (to prevent damage to and surfaces) to cut out the spots to leave me with a reusable stencil.
Before the production I had experimented with different paints and products to come across the ideal coverage for that perfect ‘froggy’ green colour. I found that Snazaroo face paint worked perfectly, Also after researching the product I had found it was hypoallergenic and quite affordable to buy in bulk.

DSCF0027

For the final design we decided on using both yellow and green Snazaroo paint for the base to allow the stencil to show better on stage. The yellow gives a better contrast against the darker green paint which we stippled over the stencil to create the spots. Overall we were both extremely happy with the make-up however we could have done with a little more time do apply it as we were a little pushed for time towards the end, but me and Tracy and Hannah worked really well as a team and got the job done in the end! Make sure to check out their blogs..

Tracy Reed – http://tracyareed.wordpress.com/
Hannah Todhunter – http://hannahtodhunter.wordpress.com/

Thanks for reading,

Katy x

Halloween Work Experience at The Crafty Workshop

During the Halloween weekend I advertised to do face painting and makeup during the day at my local craft shop The Crafty Workshop where I have worked for over 5 years. I was surprised with the turn out as I was busy all day and even had a queue! I was chuffed to bits!

My camera battery died half way through the day so I only managed to take a few snaps of a couple of looks sadly.. but here is the images for you to have a look at anyways!  If you have any questions don’t be afraid to ask!

Image

Katie came in and explained that she was going to a fancy dress Halloween party dresses as ‘Little Dead Riding Hood’ and wanted to look scary as apposed to the typical pretty little red riding hood. So I used Kryolan grease paints  to give her that dead looking skin tone. I also used darker coloured grease paints to contour and hollow out her facial features and collar bone. I also created some liquid latex wounds which I filled with cotton wool, wound filler and red bruise gel.

Image

Half skull face paints were also really popular which I was pleased about as I enjoy doing them as I think they look really effective. Again I used Kryolan grease paints however I also introduced Snazaroo face paints along with a black Virgin V pigment.

Image

Lee was attending a ghost walk later on with the local Cubs and Scouts group and want to jump out and scare the kids during the ghost hunt so, we decided to turn him into a Flesh eating zombie! For this again I used Snazaroo face paints, Kryolan grease paints and black pigment powders.

Television Adaptation

Image

The make-up on afternoon television programs such as ‘The X Factor’ and ‘Strictly Come Dancing’ The traditional style of Television make-up has been adapted to have a much more dramatic effect as contestants are often supporting eye catching looks such as deep red lips and smoky eyes. Different materials such as rhinestones, sequins and glitter are often used as these materials can be very effective as they draw attention to the performer due to the lighting on stage.

For my TV adaptation I decided to create a makeup for an evening show presenter so I didn’t want to do anything too glamorous and over the top as it may be a little distracting for the viewers. I decided to apply a dramatic red lip and a simplistic but defined eye that would still stand out on camera but would not clash with the strength of the red lip. As for the brows I originally wanted to fill them in a few shades darker however my model uses a black liquid liner to fill in her brows which really already suits her so I left the brows as they were. However I did apply a white eye shadow on the brow bone to define the brows. The application of the make-up ran quite smoothly and I am overall happy with the end result.

Image

First I buffed Illamasqua Matte Primer into the skin pre-cleansed and toned skin to create a clean base. I then used MAC Studio Tech (NC15) which I also buffed into the skin using a medium sized flat buffing brush. To get a flawless base I then used a 15 Concealer Palette by Fraulein (which I purchased from Amazon.co.uk for around £6) and used colour theory to correct any skin imperfections that the foundation had failed to cover such as blemishes and dark circles. If you would like to know more about using colour theory to correct imperfections just click the following link –https://kathrenelizabethmakeup.wordpress.com/2012/11/12/concealing-imperfections-with-the-colour-theory-correction-method/. To set the foundation I used Illamasqua loose translucent powder which I pressed onto the skin with a powder puff using a rolling motion.

Once I was happy with the base I then moved onto the eye make-up. First I used my finger to apply an all over lid coverage of Benefit’s Stay Don’t Stray Eye Primer. I then used a flat eye shadow brush to apply MAC’s Orb eye shadow all over the lid to brighten up the eye. Next I applied Virgin V Beige eye shadow to the crease making sure I blended it well with a fluffy blending brush. Next I added a darker brown eye shadow by Virgin V to further darken the crease of the eye. Although I wanted to keep the eyes fresh looking but still wanted them to be defined so I used Rimmel Black liquid eye liner to line the upper lash line before adding the thick false lashes (Eylure Girls Aloud collection – Cheryl). I created a little cat eyed flick to open the eye up and make it look that little bit more dramatic. before applying the lashes I also applied a couple of layers of Maybelline Colossal Lashes (Black) as this helps the lashes blend with the heavy black lashes.

To give the face a little more definition I used MAC Bronzer underneath the cheek bones and jaw line, although this is subtle it does make a difference on camera. I also wanted to add a bit more colour to the face, for this I gently dusted MAC blusher in the colour Cubic to the apples of my client’s cheeks to give her face a little more life. To apply this product I asked my client to give me a cheesy grin so I could locate the apples of her cheeks easier this also creates a more even look.

For the lips I followed the natural lip line with MAC lip liner (Cherry) and then used a small lip brush to apply Rimmel’s Kate Moss collection (kiss of life) all over the lips to create a classic red lip. I love this look and think its great for special occasions.

Thanks for reading 🙂

Katy xx

First Practice – Bullet Wound Casualty Simulation (Naturo Plasto Morticians Wax)

Image

Image

For this I rolled a small amount of pro wax into a ball I then flattened the ball shape before placing it onto the skin. I then blended it out to make sure it blended with the skin well. Next I used a lip liner top to create a small hole in the centre to recreate the entry of the bullet. I then loaded the hole with the home made blood I had previously made and allowed it to drip out of the wound. As the wax is a good match to my skin tone I think this product is perfect for this technique. To find out more about making your own fake blood recipe just click the following link 🙂  https://kathrenelizabethmakeup.wordpress.com/2012/10/20/fake-blood/

Katy xx

Slit Wrist Casualty Simulation (Naturo Plasto Morticians Wax)

Image

This is a really simple way to create a slit wrist casualty simulation it only took me a few minutes to do and I think it looks quite realistic. First I started by scraping out a small around of the wax from the tub and began to roll it into a small sausage shape. Then I placed it onto the skin and blended from the inside out to make sure it was well blended with the natural skin tone. Once I was happy with the blending of the wax I then used a lubricated cocktail stick to drag through the wax to create a slit. The reason for lubricating the cocktail stick to to ensure that it can slide through the wax without dragging and distorting the product too much. Finally I added dark red bruise gel with a small angled brush to act as blood. Overall I think this technique is very effective and easy to create. Perfect for Halloween make-up or for casualty simulation for film or TV.

Katy xx

Television Make-up

TV make up 1-horzImage 1 source – (http://blog.newsok.com/fashionmatters/2007/07/12/qa-with-carmindy/)
Image 2 source – (http://www.sugarscape.com/main-topics/fashion-beauty/181759/get-look-holly)

From my research I have noticed that television presenter’s makeup tends to gently define each facial feature. For example the eyes are often framed with deeper colours to define the shape and make them stand out more as eye contact is extremely important in connecting with the audience. The lips are also often defined as they too are another part of the body that is focused on when the person is talking. Although these features are enhanced they never cancel each other out as they are at the similar level of strength for example a bold lip isn’t used often as this tends to focus all attention to that particular facial feature which can be off-putting to the viewer.

TV mkeup combination

First I buffed Illamasqua Matte Primer into the skin pre-cleansed and toned skin to create a clean base. I then used MAC Studio Tech (NC15) which I also buffed into the skin using a medium sized flat buffing brush. To get a flawless base I then used a 15 Concealer Palette by Fraulein (which I purchased from Amazon.co.uk for around £6) and used colour theory to correct any skin imperfections that the foundation had failed to cover such as blemishes and dark circles. If you would like to know more about using colour theory to correct imperfections just click the following link – https://kathrenelizabethmakeup.wordpress.com/2012/11/12/concealing-imperfections-with-the-colour-theory-correction-method/. To set the foundation I used Illamasqua loose translucent powder which I pressed onto the skin with a powder puff using a rolling motion

Once I was happy with the base I then moved onto the eye make-up. First I used my finger to apply an all over lid coverage of Benefit’s Stay Don’t Stray Eye Primer. I then used a flat eye shadow brush to apply MAC’s Orb eye shadow all over the lid to brighten up the eye. Next I applied MAC’s Texture eye shadow into the crease of the lid to give the eye definition. At first I was a bit scared to use this shade as it is a deep burnt orange colour which I don’t often use however the depth of colour it gives is amazing and really brings out blue eyes. To define the eye further I then added MAC’s Concrete eye shadow to the outer corners of the eye. I also used this colour to define the brows by using a small angled brush.

I then used a thin angled brush to apply a thin line of MAC Gel Eyeliner (Black Track) to the upper lash line creating a very subtle flick at the outer edge of the eye. I also applied the same liner to the lower lash line starting from the outer corner in however I only brought the liner halfway along as I wanted the eye to appear very open and wide. The final touch was to add a layer of Maybelline Colossal Lash (Black) to both the upper and lower lashes.

To give the face a little more definition I used MAC Bronzer underneath the cheek bones and jaw line, although this is subtle it does make a difference on camera. I also wanted to add a bit more colour to the face, for this I gently dusted MAC blusher in the colour Cubic to the apples of my client’s cheeks to give her face a little more life. To apply this product I asked my client to give me a cheesy grin so I could locate the apples of her cheeks easier this also creates a more even look.

For the lips I used MAC lip liner in whirl to follow the natural lip line before adding Body Shop (14) lipstick combined with Nivea (Rose 07 Passion) to the lips with a small lip brush.

DSCF0012

I really like this look as an everyday makeup look as its subtle but still really flattering. Hope you like it!

Katy xx

Large Theatre Make-Up

Image

theatre Makeup

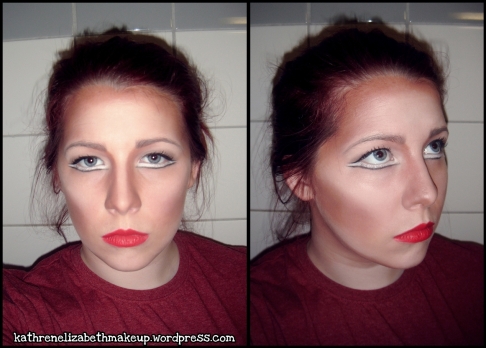
Theatre make-up often includes heavy contouring especially when it comes to large theatre as the facial features need to be defined in order for the audience to see the actor/actress’ facial features during the performance. Darker grease paints such as deep browns are often used to sharpen the facial features for example the nose can be shortened and defined by contouring down either side of the bridge to make it appear thinner, also the tip of the nose can be shaded to be reshaped or shorted. Applying the same dark shade under the cheekbones is also a very effective use of contouring as it can define the cheekbones dramatically.

Highlighting is also a key part of creating the perfect theatre contour look as it further highlights the facial features making the face sharper and brighter for example; the eyebrows can be defined by adding a lighter toned greasepaint to the brow bone and on top of the eye brow creating a contrast against the darkness of the brow.

Contouring
I first began by cleansing, toning and moisturising the skin.
(For more detail on cleansing, toning and moisturising click the following link -https://kathrenelizabethmakeup.wordpress.com/2012/10/19/cleansing-toning-and-moisturising/). Next I used Illamasqua matte primer which I buffed into the skin with a medium sized buffing brush, this step is very important as it prevents the make-up from moving or melting during the performance.

I then carried out a colour swatch on my clients jaw line to determine which colour foundation would be best for her skin tone. However I would not be looking for an exact match as I want to go at least 2-3 shades darker to make the face a warmer shade as the stage lighting tends to bleach out colour significantly. I used Maxfactor Pan stick in cool copper which I purchased from an independent make-up stand for around £4-£5, Bargin! Pan stick make-up is much thicker than regular foundation and gives great coverage so I skipped using concealer as the coverage was decent already.

There are products you could use to create heavy large theatre contouring such as darker foundations, cream concealer colour correctors, powders and greasepaints. I used greasepaint for this look as I felt it give me a good depth of colour and was really easy to blend. I used a dark brown Kryolan greasepaint and a flat foundation brush to draw dark lines similar to the image below.

Image

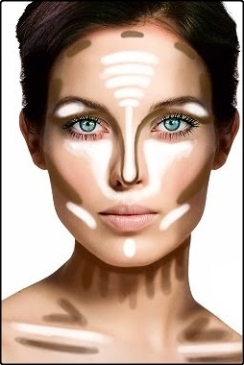
(Contouring image source http://blog.womenshealthmag.com)

I then used a flat foundation brush to blend out the harsh lines to leave behind a dark contour. Some people prefer to use a buffing brush to blend however, I like to work with a foundation brush and work the product in the opposite direction to illuminate the harsh line. Once I was happy with the blending of the brown greasepaint I then moved onto a lighter colour to add highlights to the face to help brighten up the skin and bring out the darker contouring that I had just created.  Again I blended the lighter greasepaint into the skin so the harsh lines were less visible.
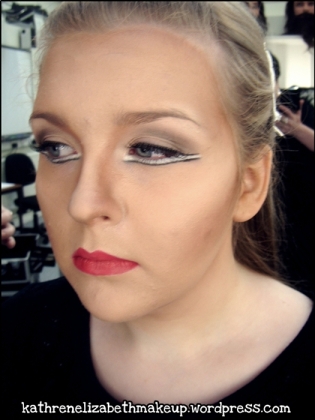
theatre makeup eyes

Eyes
First I began by covering the lid with Benefit’s Stay Don’t Stray (which is amazing by the way) this stops the makeup from moving and also creates a great base for the eye shadows to stick to. You could also use a concealer if you don’t have an eye base handy. I first applied MAC eye shadow in the colour Orb all other the lid which brightens up they eye. I next added both MAC Era and Concrete into the crease of the lid to give definition to the eye. I made sure to blend each colour with a fluffy brush as I went along.

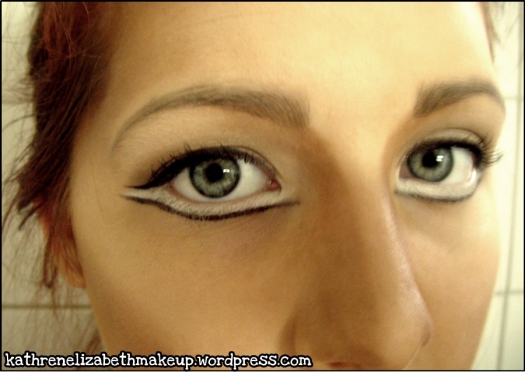
Next I used a white greasepaint (from the Kryolan B Pallet) to paint on a line under the eye to make the eye appear larger. To define the white line I next used Maybelline black liquid eye liner and a small angled brush to create a thin black line to recreate the lower lash line.  I extended the line out to make the eye appear larger. I made sure the liner was a smooth curve and not the typical cat eyed flicked liner. I then carried liner the upper lash line following the same extended shape.

Finally filled in my eyebrows with a darker brown pencil to give the face more definition. I then added a few layers of  Maybelline Colossal Lash to the top lashes to complete the eye make-up. False lashes could also be applied to make the look a little more dramatic.

Lips
For lips I firstly followed the natural lip line with MAC cherry lip liner before filling in the lips with a W7 burgundy red lip stick which I applied with an angled lip brush.

Thats it! Thanks for reading 🙂

Katy xx

Hospital Zombie Tutorial (Make-up/Hair)

Image

Zombie Dead Skin Tone
I didn’t want to create the typical white faced zombie so I decided to use beige and brown eye shadows and colour correctors to dull the skin and make it look tired, washed out and diseased.

 Image

I’m naturally quite pale so I didn’t use any foundation however, I did apply a green colour corrector cream to my face as this will take out all the warmth from my skin by illuminating any redness in my skin tone.

I then used a fluffy brush to apply the beige and brown eye shadows underneath and around my eyes to create a tired ill look. I also applied a little amount of beige around my nose and lips which really helped make me look rough and haggard. I also used a darker brown pigment to hollow out my cheeks and highlight my jaw bone by using a small blusher brush to apply the colour under my cheekbones and jawline and down onto my neck. I also used the same technique to hollow out my collar bone which worked out really well.
I made sure not to conceal any dark circles or imperfections I had as they would only add to the look. For the lips a applied a skin toned foundation to pale them out ever so slightly as my lips naturally have a pinky undertone which isn’t ideal for the look I’m trying to create.

Image

Scratches and Scrapes
To create scrapes and scratches on my face and body I used a fake blood product called Wound Filler which has a chunkier consistence than other liquid fake blood products. This product worked really well as it self-adhesive and long lasting. To apple the wound filler I used a stipple sponge (similar to the sponge I would use for pirate beards or stubble when face painting). I dabbed the sponge into the product and then dragged it across areas of my face and body to give the illusion of bloody scrapes across the skins surface.

Greasy Zombie Hair
For my hair I used gel spray, mouse and hair stray. I wanted to make my hair look dull, dirty and lifeless as zombies don’t look like they have the best hair care routine haha!
I first dampened my hair and then applied a lot of mouse and gel spray to give it that really greasy wet look. This also encouraged a natural messy wave which added to the look. This look lasted the full night but if you do see it starting to dry and not look as greasy as you’d like just add more  water as this will reactivate the products you have already applied. The products I used were just cheaper brands as I was using a large amount and didn’t want to waste my favourite products when cheaper brands will do the trick for this look.

Stitched Up Laceration
https://kathrenelizabethmakeup.wordpress.com/2013/01/06/sewn-up-laceration-tutorial-derma-wax-liquid-latex/

How To Create Some Disgusting Zombiefied Nashers with Tooth Enamel
https://kathrenelizabethmakeup.wordpress.com/2013/01/07/zombie-decayed-teeth/

Create Your Own Hostpital Zombie Costume
https://kathrenelizabethmakeup.wordpress.com/2013/01/06/hospital-zombie-costume-tutorial/

Colour Vue Contact Lenses Review
https://kathrenelizabethmakeup.wordpress.com/2013/01/07/colour-vue-contact-lenses-review/

Thanks so much for reading hope you found it useful!
Any questions? please don’t hesitate to leave a comment I’ll reply ASAP =D

Katy xxx

Zombie Decayed Teeth

Image

Image

Grimas tooth enamel, Tooth stain

To make my teeth look decayed and broken I used Grimas Tooth Enamel in Nicotine and Brown which I purchased from www.teampixie.co.uk for £4.10 each which I thought was a really good price as it’s a great product. The product itself comes in a little glass bottle similar to a nail polish bottle and it also has the brush attached to the lid in which to apply the product directly onto your teeth.  As I intend to keep this product for my kit I didn’t used the provided brush for hygiene reasons as I don’t want to contaminate the rest of the product by putting the used brush back into the bottle.

First I used some kitchen towel to dry my teeth as this would allow the product to adhere itself to the surface of my teeth. I then used a small artists brush to apply a small amount of the Nicotine colour to the base of my teeth. Before doing this I had pushed some kitchen towel under my lip to raise my lips off my teeth to prevent my lips from touching the product. Once the Nicotine colour was dry I added small amounts of brown in-between my teeth to make them look even more disgusting.

Katy xx