Sneaky Peek!

Hi everyone!! So sorry I have not been posting much this week I’ve had such a busy week with a work experience placement, for more information on what I’ve been up to this week just click on the following link to view my last post:

https://kathrenelizabethmakeup.wordpress.com/2014/04/06/work-experience-in-the-film-industry/

Okay then so, I just thought I would show you a sneak peek from a photo-shoot from last week! I haven’t got the professional edits back yet but here are just some images I had taken myself before we entered the shoot. Enjoy!

dmslkdfmsld DSCF0279

The shoot was with the fantastic Emily Bailey (ENB Photography) She’s extremely talented and was a pleasure to work with!  To see her work just click the following link to view her Facebook page:

https://www.facebook.com/ENBPhotography1

Overall the shoot ran smoothly as I was able to get the lovely Ruthie Holland (Model) ready with time to spear. The look consisted of a large black hair piece combined with a strong contoured face, striking dark smokey eyes and a deep red ombre effect lip. The neck piece I had made previously from wire and bonded fibers among other random materials. I’m really pleased with the look and can’t wait to see the final images!

Thank you for visiting my blog!

Katy x

Work Experience In The Film Industry!

Hi everyone! I have some exciting news to share with you guys!

I have been offered a really exciting work experience placement in Leeds for a total of  5 days. They are currently filming ‘Urban and the shed crew’ a movie based of the book by Bernard Hare:

isbn9780340837351-detailI have already purchased the book as part of my research and I’m really enjoying what little I have read! I have already completed my first day and I am really excited about returning to complete a further 4 days as a make-up assistant. I was unfortunately unable to take an photos on set however to view more information about the project go ahead and like their page on Facebook:

https://www.facebook.com/pages/Urban-and-The-Shed-Crew/736941962990766?fref=ts

OR visit the website:

http://www.blenheimfilms.com/main/urban/

My job roles included:

  • Making hot beverages.
  • Maintaining the sink area ensuring it is clean and tidy at all times
  • Cleaning used brushes
  • Keeping the surfaces clear and sterilised.
  • Take, print and possibly label continuity pictures.
  • Ensure the camera is fully charged and taken to set.
  • Carry set bags to and from set

What have I learned so far:

  • How to take accurate continuity pictures
  • The importance of time management
  • The importance of a set bag and its content
  • The importance of slip and call sheets
  • On set etiquette
  • When is it appropriate for make-up artists to step on set for final touches

Overall it has been an amazing experience so far and I am really excited to return and learn more.

Katy x


16th Century Wig Dressing

Hello again! Okay so here is the second part of my 16th century historical process – the dressing of the wig.

First a little bit of history:

Hair- At the end of the 16th Century in England, the hairstyles of both middle and upper classes had become more elaborate. Taking inspiration from their Queen  the ladies  chose to curl, dye, and pad out their hair to give the desired colour and shape. Though blonde was the fashionable colour for other countries (a trend that continues today – more hair dyes are in blond shades than any other), the English women of the era were loyal to Queen Elizabeth, and chose to dye their hair red hair was the most popular colour for women. 

The desire to have perfectly cured fiery red hair meant that there was a thriving business in wigs and hair pieces for women unsatisfied with their own natural hair whether is be length colour or thickness.

Rats – Elizabeth herself seems to have favoured curled hair, sometimes padded with “rats” – pads made of hair, shaped to help create the high styles that exemplified the time.  They are called rats because they’re roughly shaped like a rat – pointed on one end (the nose), high and rounded on the other (the haunches of the rat).  Elizabeth continued to wear this style until her death.

To create the typical 16th Elizabeth style, the hair from the ears back was pulled into a neat coiled bun (sometimes braided or padded to give it more bulk), and the hair from the ears forward was styled.  The bun may have been sewn into place with ribbons or thread.  Certainly the tortoise-shell pins of the Victorian era and the bobby pins of the early 20th Century were not known.  Securing the hair by sewing it into place is not as awkward as it sounds; in fact, the bun is more secure and comfortable when sewn in, as there are no pins to slip or dig into the scalp.  There would be no problem sleeping in the bun because most Elizabethans slept sitting propped up by pillows, as they feared.

Process:

4584047813

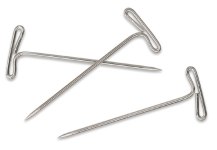
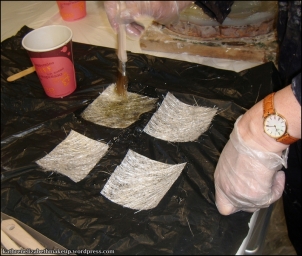
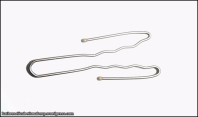
First I began by placing the wig onto a malleable block head – securing it with 5 ‘T’ pins. I placed the pins at the edge of the wig on the centre of the front of the wig, back centre, both sides and one on the very top of the head. It is important to make sure you know how many pins you have placed into the wig as you need to make sure you remove all of them before applying it to your model as this is a health and safety risk. When pinning the wig to the block I had to keep my design idea in mind. As I intend to use a bald cap to create a higher forehead I want to make sure I angle the wig correctly on the block as the style may not sit right on my models head if I styled it in the wrong direction.

DSCF0252

To view a post on making bald caps please click the following link:
https://kathrenelizabethmakeup.wordpress.com/2013/04/14/making-bald-caps/

14189


(Image source -www.leicestergalleries.com)

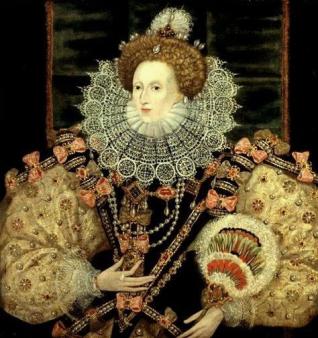
I then began researching for reference images. At first I focused on other interpretations of 16th century Queen Elizabeth themed hair. Which was a mistake as it is secondary research. Though it is impossible to gather primary research I can begin by viewing and analysing 16th century portrait paintings of Queen Elizabeth 1st as this is a better reference source as it is more true to what she looked like.

Once I gathered enough images I then began to think about how I would dress the wig to resemble the style I was looking for. As this look is going to be aimed more towards a TV and film I want it to be as accurate as possible therefore I need to carry out lots of research to make sure each aspect of the look is correct.

DSCF0088

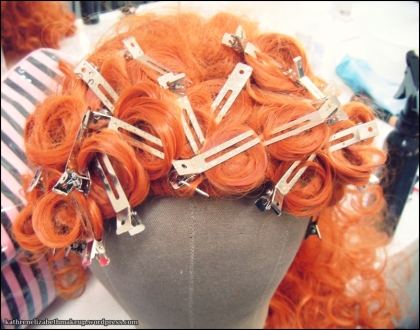
To take some of the frizz out of the curls at the front of the wig I wanted to try a pin curling method which has been effective in the past. I drenched the curls with a water spray bottle and rolled them up into pin curls with my fingers before securing them with a flat clip. These clips were perfect as they didn’t dent the curls as some clips may do.

DSCF0303

I then left the curls to dry over night to make sure they had plenty of time to dry thoroughly. I then released the curls carefully – making sure to not tangle them together. The wet set worked really well as it had taken the majority of the frizz out of the curls.

DSCF0305

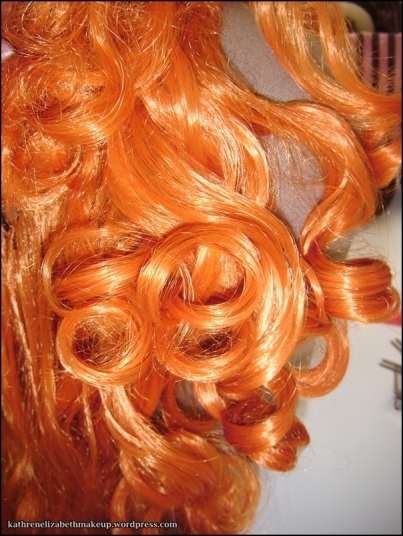
From looking at my reference images it is clear that in some pictures the hair has a lot of height at the front often in a heart shape or a rounded getting slightly higher in the centre. To recreate this is thought I would need to make padding to pin underneath the front section of the hair however this was not the case. I was able to gently back comb the hair at the root creating my own padding with the hair on the wig. To do this I took small sections and thoroughly back combed them and then used a rolling method to create a bulk at the top of the head.

DSCF0304

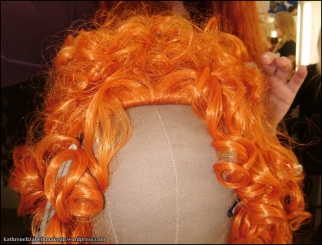
This also left me with frizzy ends at the top of the head which I could then dress into the front part of my design. Once I was happy with the volume of the wig I was then able to pin it into place. I used a different technique however. I used a fish tail clip method which is a more permanent way of securing the hair. By bending a clip at the end creates an arrow effect which anchors the pin into the weft of the wig.

DSCF0306

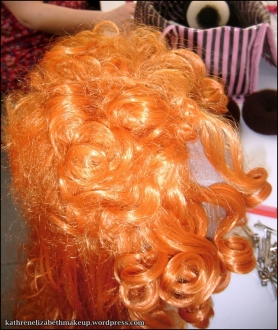
I then began to use the curls in the front to cover the front of the wig to make it look more realistic when it is on my model.

My wig is not complete at this time but I did buy some fancy assessories to add into the wig when I have completed it. I hope to have it finished by next week to then shoot the look in the Easter holidays! I shall keep you posted on how it is all coming together!

Thanks again for visiting! 

Katy x


16th Century Make-up (for Film and TV) Practice

Hello! Okay so something a little bit different now, recently I have been working on a 16th Century historical look for one of my portfolio images. I have been practicing all aspects of the look and thought to share the results with you guys! I have done some historical research into the 16th century hair and make-up trends to help me determine a correct historical look. I have also included this research in this post as I found it extremely interesting and somewhat extreme!

As this look is aimed to appeal to clients in the TV and film industry the make-up needs to be historically accurate. To do this I need to make sure my research is solid and relevant. For this task I have made good use of my historical ear file I had created last semester. I was able to recap on my research and try to recreate the make-up by using my products.

Cleanliness- In the summertime people occasionally bathed in the local river however the majority of the time people used to have a ‘strip wash’ which consisted of heating up water in a cauldron which was then splashed over the body, or they would have a ‘dry wash’ by simply rubbing themselves with a clean linen cloth.

Paints and Washes-Pale skin was seen as a sign of wealth – encouraging women to go to extreme lengths to achieve that perfectly pale complexion. Some women were known for swallowing ashes, dust, gravel and coal in order to ‘spoil their stomachs’ to give them a ghostly white face. Most women used a mixture of white lead and vinegar (Ceruse) to achieve the desired pale complexion although that was not without health risks as it was poisonous and could even cause premature death of the wearer. Many people that bathing in their own urine or rosewater mixed with wine was a way to keep the desired complexion where as others such as Diane de Poitier believed that nothing but rain water was the best when it comes to skin care.

Queen Elizabeth I was a huge fan of the bold white lead face paint as it created a high contrast between her red wigs and rouge lips. It was said that Elizabeth applied more paint to her skin as she got older to try and disguise the look of ageing this resulted in her skin being a very rough and unattractive texture due to the toxic white lead.

Egg washes-Egg washes were a way in which women could get a fashionable glaze on the skin then added to the two whites of the eggs along with white sugar and white poppy seeds to create a milky looking liquid. Finally the liquid was then strained through linen to smooth out the texture of the liquid so it could be easily applied to the face.

Rouge– Ochre and Mercuric Sulphide were used to create rouge to be added to the cheeks in various shades. A combination of Cochineal blended with gum Arabic (also used in Egyptian cosmetics) egg whites and fig milk was used to create rouge for the lips.

Eyes – 16th Century eye make-up was not as popular however other materials were used to make the eyes appear more desirable to others for example: Belladonna (also called deadly nightshade) – A poisonous herb was used as eye drops to make the pupils dilate giving a very doe eyed dreamy look. Although popular it was extremely dangerous as Belladonna can cause headaches, migraines and extreme seizures. Overdosing on belladonna could also lead to death.

Patches- Patches were usually made from velvet or taffeta and were used for medicinal purposes as it was thought that applying patches to the temples cured tooth ache. Later patches were seen as a fashionable and became more popular as the contrast between the black dot and the paleness of skin created a high contrast which they thought made their skin appear even paler. Although made fashionable during the end of the 16th century Ancient Romans first invented the use of patches.

Process:

DSCF0185

Base- I first wanted to make sure that I was able to get a good base tone mixed up to create the sort after pale skin. I began by applying a satin primer to try and simulate the egg wash glaze they applied. Starting with a dewy base I was then able to begin adding a white foundation. I chose to use a liquid foundation as they used a white liquid made from egg whites, poppy seeds and white sugar. This was then strained through linen and applied directly onto the face. I used a white foundation from Illamasqua – I began by gradually building up the colour onto the skin using a buffing brush to ensure I didn’t get any brush strokes.

DSCF0190

Cheeks-I then experimented with different blush shapes to determine which was more suited to the era – using my reference images as a guide. On the left the blush is more circular and deliberate. However I prefer the other side as it looks more natural and suited to the character as I feel the left side is nearing towards the 18th century make-up trends. From looking at the research imagery I have gathered. Elizabeth is often depicted with completely pale skin with little or no rouge on her cheeks.

Eyebrows – From looking at my research Elizabeth is often depicted with very fair thin eyebrows.  As I was only experimenting at this point I wanted to try and cover the eye brow to see what effect if give however it was clear that I will need to add more coverage to the brow area if my model has eyebrows similar or thicker than my own. Perhaps cover the brow first using one of the methods the class experimented with at the beginning of the semester. This would also add another skill to the image which I would be able to sell when presenting my final image in my portfolio. However I want to find out what my models natural brows are like as they may not need that much coverage if any at all. Although this would add another skill to the image I think it would be difficult to blend the eye brow into the white foundation as the product would cling to the glue giving the illusion away. Bleaching the eyebrows may be required if my model is willing. This may require further experimentation.

DSCF0191

Eyes – I also experimented with a light brown eye shadow to help define the eye area. Although eye make-up was not popular in the 16th century I thought it would be best to define the eyes ever so slightly to create a contrast between the pale skin and eyes. In the 16th century Belladonna was used to make the eyes appear glistening and innocent. To recreate this I will be using ‘Blink’ eye drops to make the eyes appear twinkly as if affected by Belladonna. I may also be able to simulate some sort of irritation around the eyes as Belladonna was highly poisonous and could lead to severe seizures and possible death if over used. I think this would be a subtle way to make the eyes stand out but for the accurate anatomical reasons.

download


(Source of image – http://www.amo-inc.com)

Thanks for reading, I hope you found the reaserach as interesting as I did!

Katy x

Evaluation/Reflection:
Overall I pleased how I was able to use my modern day products to recreate a historical look. I would like to experiment with other products and push this look even further. However I am also working on a wig and costume to complete the look which I think will aid the final look. I will be posting more on this project later today.

Completing The Fiberglass Moulds

Hi guys! Okay so here is the next steps taken after completing my sculpt! Hope you enjoy, if you have any questions please don’t hesitate to contact me.

So first things first. Personal Protective Equipment (PPE) – Respirator, protective clothing, plastic gloves, protective gloves,  work in a well-ventilated area.

DSCF0251

Now that the sculpt is protected with the releasing agents I was then able to start the fiberglass process. I first began by laying the moulds onto a protected surface as fibreglass is extremely messy and sticky. It is also flammable as it heats up during vulcanisation. Laying a plastic sheet down is a useful short cut as it makes it easier to clean up from surfaces.

Combo gel coat


Next I begin cutting up small squares of fibre glass tissue in preparation for the next step. I then mixed half a cup of gel coat with catalyst added to speed up the vulcanisation process.  Once mixed thoroughly I was then able to apply it all over the two positives. I then waited for it to cure until it was tacky to the touch.

combo 2


The next step was to apply a generous coat of laminating resin all over the cured gel coat. This would allow the fibreglass tissue to adhere to the gel coat. Whilst the laminating coat was still wet I applied one layer of tissue flattening down each strip with more laminating resin on a brush. I then left it to dry in a well-ventilated room (using the extractor fan). I did not have to cut this layer as I had made sure to lay each piece of tissue down neatly so I was able to skip this step.

DSCF0185

Once that layer had cured I was then able to apply two layers of fiberglass matting (again using the laminating resin and leaving it to dry in between layers.)

DSCF0239

I then left the fibre glass to solidify over night to make sure it was completely cured. The next step was to drill holes through both parts of the mould to allow washers and screws to be used as a way of closing and clamping the mould shut. This is important as the mould needs to be tightly closed to ensure the appliances edges are thin and true to the sculpted edges.

DSCF0241

After the holes are drilled the mould can then be separated and cleaned out. I had problems with this as my mould had fused together in some parts however once the edges had been sanded down the mould was then able to be prised open using metal tools (As I was dealing with sharp metal object I made sure to wear protective gloves).

DSCF0035

I then used a selection of wooden and metal sculpting tools to clean out the Plasterline from the mould in preparation for casting. I also use lighter fluid to further clean the mould as this dissolves the Plasterline easily.

DSCF0220

Then the mould is ready for casting! (I unfortunately forgot to take a picture of the finished mould, But I will make sure to post one this week!)

Hopefully we will be able to run it in foam latex however due to time limitations within college is may only be made from latex which may be disappointing. Stay tuned to see the finished look after the 28th of April!

Thanks for visiting! Don’t forget, if you have any questions just leave me a comment and I will be sure to reply as soon as I can!

Katy x

Evaluation/Reflection:
As I have had quite a lot of practice with fiberglass I now feel confident enough with this process. The only troubles I had with this part of the process was the releasing of the moulds as mine had fused together as the fiberglass has overlapped when drying which was unfortunate. However, I am going to be able to solve that problem by sanding off the edges which will free the mould allowing me to open it with ease. Overall I am very happy with quality of the mould however the true test of how good the mould is will be apparent when I come to casting it in foam latex.

Preparation The Sculpt – Flashing / Releasing Agents

Hi everyone! I thought I’d share a great tip I have learned this week during my special effects lesson. A simple method that prevents thick edges on an appliance. A method called ‘flashing’: DSCF0244 Flashing is term used to describe a technique that prevents thick edges during the casting of a mould. A layer of Plasterline is applied to the positive framing the sculpt leaving a gap (roughly just under 1cm) creating a moat like effect around the entire circumference sculpt. When fibreglass is layered over the sculpt the moat will be filled making it tighter allowing the foam latex to drain creating a thinner edge as the mould will be tighter in this area. Flashing also aids undercuts as you are able to smooth out difficult surfaces such as the inner ear and around the nose area. DSCF0228 I made sure to leave the keys clear from Plasterline as this would aid the alignment of the mould when casting. Once the flashing was complete I was then able to move onto the next stage. Releasing agents: DSCF0247 Before applying fibreglass onto the sculpt I had to take precautions to stop it sticking to the Plasterline as this would make it extremely difficult to clean. I first applied a thick coverage of silver vinyl removable coating. Using a coloured vinyl coating helps identify it on the positive as I will be able to see if I have missed out any parts of the sculpt. I made sure to spray the vinyl coating under the extractor fan as a health and safety precaution so myself and my class mates do not breathe in the areole. I then left it to dry for around ten minutes. DSCF0250 Next I added two coats of ‘Macwax’ wax releasing agent as a further precaution – leaving it to dry for ten minutes in between each coat. Now that the sculpt is protected I can now move onto the next step. Completing the fiberglass mould! Stay Tuned! Thanks for reading, Katy x 

Sculpting Onto The Fiberglass Possitive

Hi guys! Hope you found the previous posts interesting! Now the process of making a fibreglass positive is complete I can now finally get creative!

After I have completed my design ideas and decided on my final design I can then begin the sculpting process. To do this I began by looking at my models face  to figure out where her face moves – where wrinkles may gather during facial expressions etc.

This would help me sculpt an appliance that would move naturally on the face as it would be able to crease in all the correct places.  I then took a pencil and gently drew on the fibreglass inner to create a guide for me to follow throughout sculpting.

DSCF0215

I then began blocking out my desired shaped by applying small sausage shapes of Plasterline onto the surface of the positive to create a thin layer of Plasterline that was not too far from the face as this would help create the illusion that the appliance is part of my models natural skin. I then gradually blended the small sausages together to create thin coverage over the parts of the face I wanted to cover with the appliance. I was then able to add more sausage shapes on top of this to create height in areas I wanted to build up such as the cheeks and brow bone.

DSCF0227

Once I was happy with the basic shape of the sculpt I was then able to begin texturing the Plasterline to make it more realistic. I tested a variety of methods such as sponging and stippling alongside using various tools until I was happy with the effect. I also experimented with thick plastic wrapping which created a different effect which worked perfectly for any wrinkles and fine lines I wanted to create as it simply made an intend rather than dragging the Plaster line around the surface. The effects of using this method were a lot more subtle. I used this method particularly around the eye and forehead area.

DSCF0234

I also used a loop tool to carve into the Plasterline as this would remove the unwanted Plasterline rather than moving it around the sculpt which would create raised edges.

combooo


To make sure the edges are as thin as possible I used a few different techniques to make sure they were feathered out evenly. I first blended them out with my finger. Then used various rubber tipped tools to further blend the Plasterline outwards. Once I was happy with the majority of the edges then used a soft brush saturated in lighter fluid to gently remove the outer edges. Making sure the edges didn’t drag out too far. To make the edges harder to identify when the appliance is cast I made the edges slightly jiggered as this would trick the eye distorting the lines between the face and appliance. If I create a straight lined edge it would be more difficult to blend into the natural skin during application.

Thanks for viewing my blog 🙂

Katy x

Evaluation / Reflection:
I really enjoyed this part of the process as it allowed me to get creative with the sculpting aspect of the process. It give me a change to try different sculpting techniques which I have never attempted before such as using the plastic sheets in between the Plasterline and the tools. I will be sure to use these new found techniques again as I felt they were really effective and brought new exciting textures to my sculpture.


Making the Fiberglass Positive

Hi everyone! Thanks for visiting!

During this post I will be explaining the next steps towards finishing my fiberglass mould. If you have missed the previous posts and are interested in have a look. Just click the following links:

https://kathrenelizabethmakeup.wordpress.com/2014/03/06/preparing-silicon-inner-for-fiberglass-moulds/
https://kathrenelizabethmakeup.wordpress.com/2014/03/06/making-the-fibre-glass-outer-part-of-the-mould/

Ok so here we go!

1 (3)


Once the negative was finished we could then move onto making the positive in which we are going to be sculpting onto. To do this we first had to free the fibreglass and silicone inner from the plaster live cast.

1 (2)

Using a wooden sculpting tool I gently prized them apart being very careful not to cause any damage to either part. This was quite difficult as it was suctioned together however once air had got in between the silicone and plaster it come away quite easily.

1 (4)

We then placed the plaster live casts to one side to create more space for the next step.  As precaution we covered the tables with plastic to make any spillages easier to clean up and to prevent any damage to the surfaces.

1 (10)

Next we then placed sausage shaped of clay onto the front of the negative to ensure it did not roll around the table or get damaged when it was placed face down.

Combo gel coat


We then mixed up a half cup of gel coat to begin the fibreglass process. Same as before we used the same ratio of catalyst and applied I layer all over the silicone inner. This would pick up the detail of the silicone giving us a perfect surface to sculpt on top of. We then added a generous layer of fiberglass fibres of the top of the gel coat to pick up further detail.

comb

Health and safety: Never place the cups and brushes directly into the bin after use – Fibre glass heats up when it cures, meaning it is a fire hazard. It is best to let it cure in sight completely.

1 (14)

Although the ratio of the fibre glass was the same we decided to experiment and add another element to the mixture. We wanted to change the colour of this part of the mould so we added a metal powder colourant. We mixed a significant amount of the powder into the gel before applying the first coat. This would give us a metallic brass colour which we could polish up later. I also sprinkled a small amount of bronze onto the gel coat to see how it would turn out. This is a useful method to experiment with as I may want to make something directly out of fibreglass in the future instead of only using it as a mould making material.

Once the gel coat was applied we then left it to cure for around an hour. This would allow the gel coat to cure but not become completely dry – leaving the surface slightly tacky ready for the next step.

DSCF0185

We then cut 3inch square pieces of fibreglass matting in preparation as our hands were about to get sticky! We cut around 13-15 pieces just to make sure we had enough. We then laid out another piece of plastic sheeting onto the table to protect the surface.

combo 2


Next we measured out half a cup of laminating fibreglass resin (using a new cup – to prevent cross contamination) we also added the catalyst to the resin using the same measurement as before (up to the measurement of ’2’ on the neck of the bottle). We then mixed it thoroughly.

DSCF0185

We then used a brush to paste a layer over the tacky surface of the gel coat this will help the next layer adhere. We then placed four pieces of the matting onto the plastic sheeting and saturated them with the resin. Once all four have been coated the first square we painted would have had time to absorb the resin making it softer – allowing it to mould to the shape of the silicone inner. We then applied each square onto the surface of the painted on layer of the resin. We then used a paper mache method by pasting another coat over the top of the matting to make sure it was flat without any air bubbles. We made sure each square overlapped slightly to make sure there was not gaps.

We then left it to dry for around 20 minutes until it goes a green colour. To prevent using power tools we cut the edges of the fibre glass at this time as the fibre glass is solid but still flexible. We then repeated the process – adding a second layer. Then we left it to dry completely over night.

1 (25)


Once dry we were able to use a variety of tools to separate the silicone from the fiberglass positive.

comb


Once the two parts were separated we were left with the fiberglass positive! I was shocked to see how much detail the gel coat had picked up.

DSCF0040

Although I was happy with the positive I noticed that it was a little sticky to the touch as the fiberglass had not cured completely so I decided to try and get rid of this texture with wire wool. This would also polish up the colours in the fiberglass revealing a metallic shine.

DSCF0045

Thank you for readying! Hope you found this helpful. Stay tuned for the next steps!

Katy x

Evaluation / Reflection:
During the making of the fibreglass positive it became clear to me why we created the silicone inner and other fibre glass section. The silicone was used to pick up the detail from the plaster face cast. The silicone was then supported by fibreglass (to keep its shape) which then allowed us to remove the plaster life cast.  I was really pleased with how the positive turned out as the first gel coat had picked up even the finest detail (some details that I wasn’t aware of) I have yet to try and sculpt on this type of positive however I like how lightweight and strong it is. It also has a smooth texture which will help me blend out the plasterline.

Vanity Themed Shoot

Hi guys! I have images to share with you. Unfortunately these images are the best quality as these are just some quick snaps from the day.

The shoot was based around once of the seven deadly sins – Vanity.  We decided to go for a really heavy make-up look with extravagant hair to highlight the fact that she is highly interested in her appearance. Overall I really pleased with the look!
I would like to say a big thank you to the lovely Sharna Leigh for modeling and Katie Johnston for shooting!
Here are the images hope you enjoy:

10173298_10203563012779726_1514252566_n 10248804_10203563013019732_1940783445_n 10248852_10203563012619722_2144544062_nThanks for visiting!

Katy x


Making the Fibre Glass Outer Part of the Mould

Hi guys! Here is the next step of making our silicone inner and fiberglass moulds..

So, once we had prepared the silicone inner for the mould we were then ready to start the process of creating the fibre glass outer section of the mould.

The reason we are applying a fiberglass section is to support the silicone as it would not hold its shape throughout the casting process as it is a flexible material. Therefore the fibreglass acts as a lightweigh support for the the silicone. It would be possible to use plaster and plaster bandages however fibre glass I more durable and a lot lighter.

So lets begin,

DSCF0173 So to begin with we removed the mod-roc and clay wall from around the edge of the cast. Then we used paper towel to remove any moisture that may be resting on the top of the silicone – If the silicone is damp or wet, the fibreglass would not cure. We also trimmed away any excess silicone around the edges leaving a clean edge.

Depending on the surface you apply fibreglass on top of a releasing agent may be needed as fibreglass adheres to pretty much anything however silicone is felxible and can easily peel away.

Once preped, we were then able to move onto mixing the first gel coat of the fibreglass. To do this we began by measureing out half a cup of the gel coat.

 2To ensure we didn’t dip the gel coat over the floor we placed down some plastic sheets to make it easier to clean if we did spill. We also used a wooden flat stick to help scrape the excess off the side of the cup before bringing it over to the table.

It is always to keep in mind cross contamination as you do not want to ruin the full tub of gel coat so we made sure that the cup and stick we used were clean.

 DSCF0179We then added a catalyst which would allow the gel coat to vulcanise. We used the measurer on the bottle to measure up to the ‘2’ mark. Any more that that would result in the gel coat curing quicker than we need which may cause a problem!

 DSCF0180We then thoroughly mixed it together and applied a thick coating over the top of the silicone with a cheap brush.

Health and safety: Never place the cups and brushes directly into the bin after use – Fiber glass heats up when it cures, meaning it is a fire hazard. It is best to let it cure in sight completely.

3

Usually you would add a layer of fibre glass strands to the gel coat (however we forgot to do this part!)

Once the gel coat was applied we then left it to cure for around an hour. This would allow the gel coat to cure but not become completely dry – leaving the surface slightly tacky ready for the next step.

 DSCF0191We then cut 3inch square pieces of fibreglass matting in preparation as our hands were about to get sticky! We cut around 13-15 pieces just to make sure we had enough. We then laid out another piece of plastic sheeting onto the table to protect the surface. we then laid out 4 pieces of the matting onto the plastic to preparation for the next step.

 DSCF0184Next we measured out half a cup of laminating fibreglass resin (using a new cup – to prevent cross contamination) we also added the catalyst to the resin using the same measurement as before (up to the measurement of ’2’ on the neck of the bottle). We then mixed it thoroughly.

DSCF0185

We then used a brush to paste a layer over the tacky surface of the gel coat this will help the next layer adhere. We then used a brush to saturated the 4 piece of matting we had laid out with the resin. Once all four have been coated the first square we painted would have had time to absorb the resin making it softer – allowing it to mould to the shape of the silicone inner.

DSCF0188-horz

We then applied each square onto the surface of the painted on layer of the resin. We then used a paper mache method by pasting another coat over the top of the matting to make sure it was flat without any air bubbles. We made sure each square overlapped slightly to make sure there was not gaps.

DSCF0189

We then left it to dry for around 20 minutes until it goes a green colour. To prevent using power tools we cut the edges of the fibre glass at this time as the fibre glass is solid but still flexible. We then repeated the process – adding a second layer. Then we left it to dry completely over night.

That is all for now! I shall be posting the next stages after next weeks lesson!

Thanks for visiting my blog!

Katy xx