Hand Casting
You will need:
– x1 empty 2 litter bottle
– Scissors
– Vaseline (Not a necessity)
– Access to water
– Power drill
– Squirrel piece to fit onto drill
– x2 Flexible bucket
– Alginate (roughly one and a half bags)
– Plaster
– Flexible bowl
– Metal filing tool

First we prepared the mould casing. To do this we cut the top off a 2 litter bottle using a pair of shape scissors (be careful! Keep your fingers well out of the way). We made sure there was no shape pointy bits as this could scratch our models arm during casting. If you want to cast both hands at a time you need to find a large mould casing so you can fit both hands in without touching the sides. Once we had cut the bottle to size we needed to place it correctly so that our models hand could hang freely into the bottle without touching the bottom.

Next we mixed a batch of alginate. As it was a large batch we used a flexible bucket and a power drill with a squirrel mechanism attached to the end to mix it better. To make sure we didn’t make too much alginate we measured the amount by filling up the cut up 2 litter bottle leaving around 1-2 inches at the top. We made sure the water was tepid and not hot as this would boost the curing time giving us a shorter working time. We added the water to the bucket and gradually sprinkled in the alginate whilst drilling. Once the mixture was similar to a lumpy custard texture it was ready to pour.

We only have around 3minutes to pour the alginate before it starts to vulcanise (set/cure) so we had to pour it instantly after mixing.We asked our model to dangle her hand comfortably into the bottle so I was able to pour it down one side to eliminate bubbles. Hannah (our model) wriggled her hand ever so slightly to get rid of any air bubbles attached to her hands. The alginate set pretty quickly however we left it for a further 5 minutes to ensure it was completely vulcanized.
Tip! If your model had dry skin or suffers from eczema you can add a light layer of petroleum jelly to the hand and wrist prior to mixing the alginate, this may trap extra air bubbles however.

Once cured, we then asked Hannah to gently wriggle her fingers to allow air into the mould. This is a really important stage as if the air didn’t gradually work its way down the cast the fingers would suction together resulting in tears in the alginate. We made sure to release Hannah’s hand slowly and steadily to prevent any tears as alginate is a flexible but fragile material.

Once Hannah’s hand was free this is what we were left with!
We then mixed up a batch of plaster to pour into the hand cast (the negative) to make the positive. To do this we began by adding a cup of cold water to a plastic (easy bendable) mixing bowl then gradually sieved handfuls of plaster on top of the water until the surface looked like wet cracked sand. We then left it to stand for a few seconds and then mixed it with our hands to make sure there were no lumps or air bubbles as this will affect the quality of the positive. (The plaster should be of a similar consistency to double cream).

We didn’t pour all the plaster in at first as we wanted to do a light coating first to make sure we got as much of the detail caught by the alginate. To do this we poured plaster into the finger tips only and then picked up the mould and rolled the plaster around to make sure all the edges we covered (If anyone has ever rolled glazed pottery it is pretty much the same method). Once we had done that we then slowly filled up the rest of the mould. We continued to fill the mould up to the top to create a base so the hand could stand up once set.

We then left the plaster to cure for around half an hour. (If possible leave for longer as the plaster was still a little damp and fragile when we took it out). Once set we then began to remove the negative.
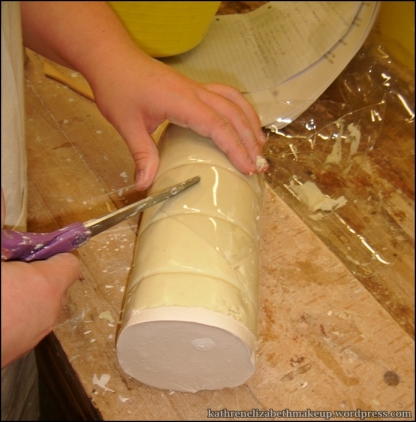
First we gently cut away the cup being careful not to dig the scissors into the alginate underneath.

Once the plastic bottle was removed we then began to chip away at the alginate piece by piece with a wooden tool. We had to make sure we were really careful when doing this as we don’t want to damage the plaster as this will eliminate vital details if scratched, details such as the small lines, creases and the texture of the skin is vital when creative a silicone hand for example as those little details make the piece look more realistic.

Once all the alginate it removed you then have your positive! If there is any air bubbles or imperfections they can easily be filed down gently with a metal tool. When filing away imperfections it is important that you try to follow the natural lines in the skin as this is more forgiving if you accidently scratch the plaster.

Then you’re done!
Evaluation / Reflection:
Overall I thought the process was quite straight forward and a lot easier than expected. If I was to do this process again I would perhaps make sure our model has all her fingers separated as Hannah’s little finger was touching her ring finger. However it is hard to judge the positioning of your hand when you can not see it due to the Alginate. A way of overcoming this problem is to use a larger container so our model doesn’t have to be so careful not to touch the edges of the bottle – this may result in using a larger amount of alginate however it will give a better result.
Thanks for visiting my blog! If you have any comments or questions please don’t hesitate to contact me!
Katy x
