Completing The Fiberglass Moulds

Hi guys! Okay so here is the next steps taken after completing my sculpt! Hope you enjoy, if you have any questions please don’t hesitate to contact me.

So first things first. Personal Protective Equipment (PPE) – Respirator, protective clothing, plastic gloves, protective gloves,  work in a well-ventilated area.

DSCF0251

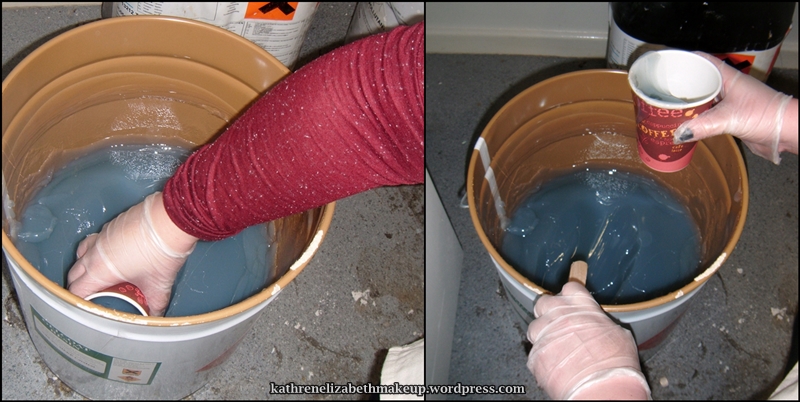
Now that the sculpt is protected with the releasing agents I was then able to start the fiberglass process. I first began by laying the moulds onto a protected surface as fibreglass is extremely messy and sticky. It is also flammable as it heats up during vulcanisation. Laying a plastic sheet down is a useful short cut as it makes it easier to clean up from surfaces.

Combo gel coat


Next I begin cutting up small squares of fibre glass tissue in preparation for the next step. I then mixed half a cup of gel coat with catalyst added to speed up the vulcanisation process.  Once mixed thoroughly I was then able to apply it all over the two positives. I then waited for it to cure until it was tacky to the touch.

combo 2


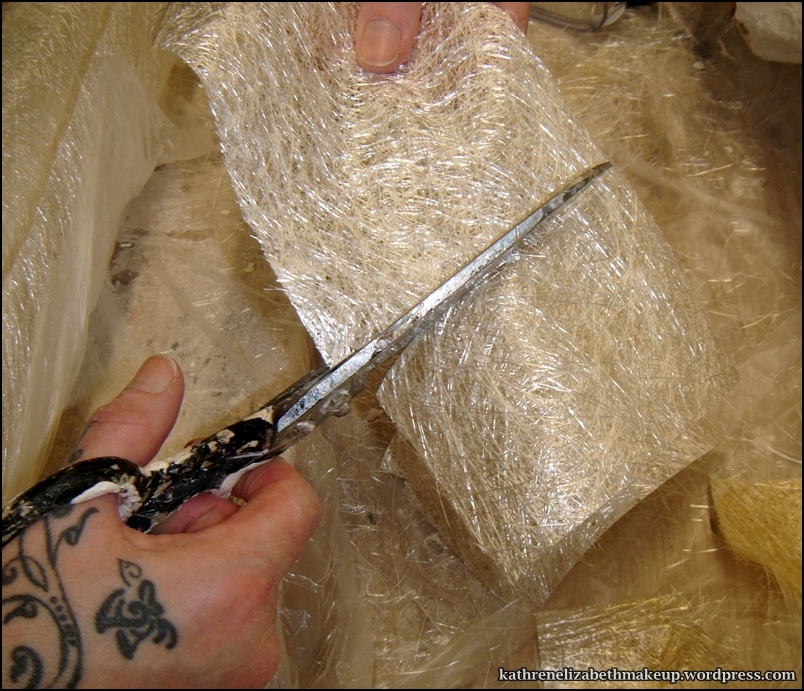
The next step was to apply a generous coat of laminating resin all over the cured gel coat. This would allow the fibreglass tissue to adhere to the gel coat. Whilst the laminating coat was still wet I applied one layer of tissue flattening down each strip with more laminating resin on a brush. I then left it to dry in a well-ventilated room (using the extractor fan). I did not have to cut this layer as I had made sure to lay each piece of tissue down neatly so I was able to skip this step.

DSCF0185

Once that layer had cured I was then able to apply two layers of fiberglass matting (again using the laminating resin and leaving it to dry in between layers.)

DSCF0239

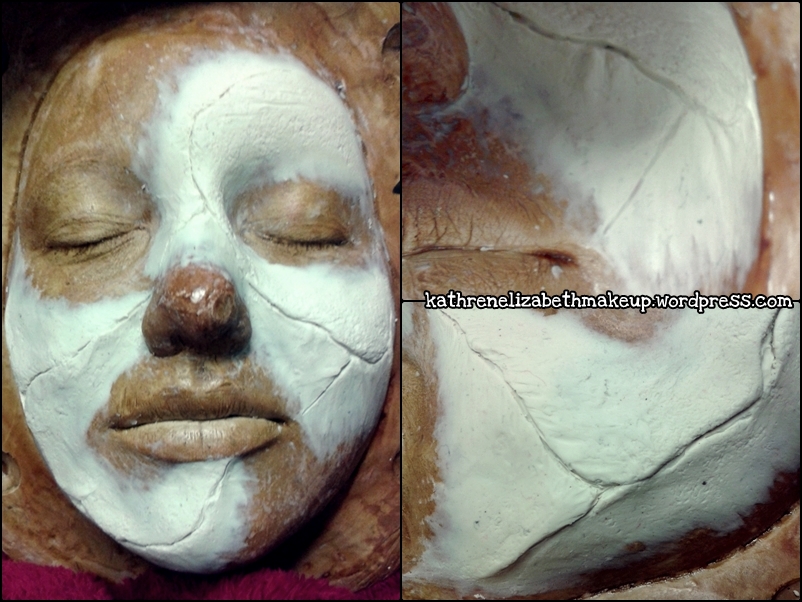
I then left the fibre glass to solidify over night to make sure it was completely cured. The next step was to drill holes through both parts of the mould to allow washers and screws to be used as a way of closing and clamping the mould shut. This is important as the mould needs to be tightly closed to ensure the appliances edges are thin and true to the sculpted edges.

DSCF0241

After the holes are drilled the mould can then be separated and cleaned out. I had problems with this as my mould had fused together in some parts however once the edges had been sanded down the mould was then able to be prised open using metal tools (As I was dealing with sharp metal object I made sure to wear protective gloves).

DSCF0035

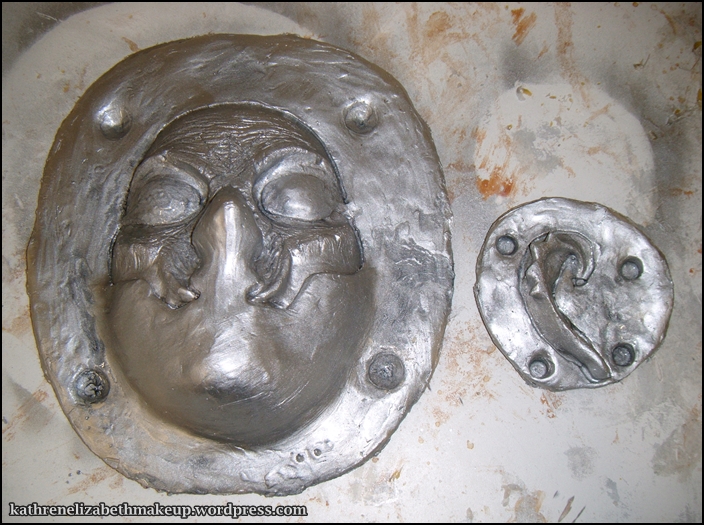
I then used a selection of wooden and metal sculpting tools to clean out the Plasterline from the mould in preparation for casting. I also use lighter fluid to further clean the mould as this dissolves the Plasterline easily.

DSCF0220

Then the mould is ready for casting! (I unfortunately forgot to take a picture of the finished mould, But I will make sure to post one this week!)

Hopefully we will be able to run it in foam latex however due to time limitations within college is may only be made from latex which may be disappointing. Stay tuned to see the finished look after the 28th of April!

Thanks for visiting! Don’t forget, if you have any questions just leave me a comment and I will be sure to reply as soon as I can!

Katy x

Evaluation/Reflection:
As I have had quite a lot of practice with fiberglass I now feel confident enough with this process. The only troubles I had with this part of the process was the releasing of the moulds as mine had fused together as the fiberglass has overlapped when drying which was unfortunate. However, I am going to be able to solve that problem by sanding off the edges which will free the mould allowing me to open it with ease. Overall I am very happy with quality of the mould however the true test of how good the mould is will be apparent when I come to casting it in foam latex.

Making the Fibre Glass Outer Part of the Mould

Hi guys! Here is the next step of making our silicone inner and fiberglass moulds..

So, once we had prepared the silicone inner for the mould we were then ready to start the process of creating the fibre glass outer section of the mould.

The reason we are applying a fiberglass section is to support the silicone as it would not hold its shape throughout the casting process as it is a flexible material. Therefore the fibreglass acts as a lightweigh support for the the silicone. It would be possible to use plaster and plaster bandages however fibre glass I more durable and a lot lighter.

So lets begin,

DSCF0173 So to begin with we removed the mod-roc and clay wall from around the edge of the cast. Then we used paper towel to remove any moisture that may be resting on the top of the silicone – If the silicone is damp or wet, the fibreglass would not cure. We also trimmed away any excess silicone around the edges leaving a clean edge.

Depending on the surface you apply fibreglass on top of a releasing agent may be needed as fibreglass adheres to pretty much anything however silicone is felxible and can easily peel away.

Once preped, we were then able to move onto mixing the first gel coat of the fibreglass. To do this we began by measureing out half a cup of the gel coat.

 2To ensure we didn’t dip the gel coat over the floor we placed down some plastic sheets to make it easier to clean if we did spill. We also used a wooden flat stick to help scrape the excess off the side of the cup before bringing it over to the table.

It is always to keep in mind cross contamination as you do not want to ruin the full tub of gel coat so we made sure that the cup and stick we used were clean.

 DSCF0179We then added a catalyst which would allow the gel coat to vulcanise. We used the measurer on the bottle to measure up to the ‘2’ mark. Any more that that would result in the gel coat curing quicker than we need which may cause a problem!

 DSCF0180We then thoroughly mixed it together and applied a thick coating over the top of the silicone with a cheap brush.

Health and safety: Never place the cups and brushes directly into the bin after use – Fiber glass heats up when it cures, meaning it is a fire hazard. It is best to let it cure in sight completely.

3

Usually you would add a layer of fibre glass strands to the gel coat (however we forgot to do this part!)

Once the gel coat was applied we then left it to cure for around an hour. This would allow the gel coat to cure but not become completely dry – leaving the surface slightly tacky ready for the next step.

 DSCF0191We then cut 3inch square pieces of fibreglass matting in preparation as our hands were about to get sticky! We cut around 13-15 pieces just to make sure we had enough. We then laid out another piece of plastic sheeting onto the table to protect the surface. we then laid out 4 pieces of the matting onto the plastic to preparation for the next step.

 DSCF0184Next we measured out half a cup of laminating fibreglass resin (using a new cup – to prevent cross contamination) we also added the catalyst to the resin using the same measurement as before (up to the measurement of ’2’ on the neck of the bottle). We then mixed it thoroughly.

DSCF0185

We then used a brush to paste a layer over the tacky surface of the gel coat this will help the next layer adhere. We then used a brush to saturated the 4 piece of matting we had laid out with the resin. Once all four have been coated the first square we painted would have had time to absorb the resin making it softer – allowing it to mould to the shape of the silicone inner.

DSCF0188-horz

We then applied each square onto the surface of the painted on layer of the resin. We then used a paper mache method by pasting another coat over the top of the matting to make sure it was flat without any air bubbles. We made sure each square overlapped slightly to make sure there was not gaps.

DSCF0189

We then left it to dry for around 20 minutes until it goes a green colour. To prevent using power tools we cut the edges of the fibre glass at this time as the fibre glass is solid but still flexible. We then repeated the process – adding a second layer. Then we left it to dry completely over night.

That is all for now! I shall be posting the next stages after next weeks lesson!

Thanks for visiting my blog!

Katy xx

Glatzan – Brow blocking Experiment (Gone wrong!)

Hello! Ok, so during yesterday’s lesson the full class was asked to demonstrate different ways in which to block out natural eye brows. we were all split into different groups and assigned different methods. Our group was assigned the Latex OR Cap Plastic (Glatzan) method. I have often experimented with covering my own natural eye brows using the glue stick method (There are plenty of tutorials for this method on YouTube) ~I did this for my ‘Drag Queen’ make-up I shall post a link bellow! I personally found it the easiest way to cover the eyebrows however it was time consuming as you have to wait for each coat of glue to dry completely before applying anything on top of it.

combineeeDrag Queen Make-up – https://kathrenelizabethmakeup.wordpress.com/2013/08/12/drag-make-up/

When researching into covering the eyebrows with Cap Plastic we could barely find anything! Our group had previously worked with both Cap Plastic and Latex however we had never used it so near the eyes before. So after revising the health and safety datasheets we then felt comfortable and safe to experiment with the products.

What is a product datasheet?
A datasheet is a document summarising the performance, and characteristics of a product. It also includes the properties of the product along with health and safety risks and first aid precautions.

We decided to only demonstrate the cap plastic method as in theory it would be more effective. We had previously used this material when making bald caps and remember it blending really well onto the skin with acetone. Latex however has a different texture to the skin completely and personally I find it really difficult into the natural skin as make-up products react differently on it. e.g. some foundations simply glide off and gather in the creases and edges of the latex.

Ideally I would have preferred to practice coving the brows with Glatzan Prior to demonstrating it in front of the class however we didn’t manage to have time to do it as each layer of cap plastic took longer than expected to dry.

You will need:
Glass tile
Plastic wrap (or a clear plastic bag)
Clear sticky tape
Marker pen
Scissors
Acetone
Glatzan (cap plastic)
Cheap Brush
Petroleum
Glue stick jelly
Translucent powder and blush brush
Spirit gum
cotton buds / cotton pads
Greasepaints (preferably rubber mask paints)
Brushes (to blend the greasepaint on)
Bond Off  (for removal process)

DSCF0084

To ensure we made a piece that was the correct shape we took a pattern of our models eyebrows by using a plastic wrap method. To make the pattern we began by placing a square of plastic wrap over her eyebrow and used sticky tape to strengthen and mold the plastic to the shape of her face. As the plastic is see through we were able to see her natural brow shape on the top of the plastic. Once we had drawn on the brow we then were able to remove the plastic leaving us with a pattern.

We then placed the pattern under a class tile. The next step was to prepare the glass. First we added a light layer of petroleum jelly over the pattern and added translucent powder over the top with a light blush brush. This prevents the Glatzan from sticking to the glass surface. We then prepared for the next step – applying the Glatzan.

To make sure that the brushed don’t get permanently damaged we made sure to have a cup of acetone to drip the brush in after each coat. We added each coat in a cross hatch directions making sure each coat was completely dry before adding the next coat. We also added a light coat of powder in between each coat to make it easier to apply the next coat. We added around 4-5 layers gradually moving inwards to make sure we had a thinner bendable edge.

Once completely dry we then gradually peeled away the plastic, this left us with a small piece that we can blend over the eye brows.

combo

Tip! There is a different method however.. Instead of layering the Glatzan onto a glass tile you can add it onto an orange as this provides a pour like texture and gives it a natural roundness.

Application:
First we cleansed and toned the eyebrow area to make sure the piece would adhere to the skin. Next we flattened the eye-brow down with a glue stick – simply running it along the brow. (I didn’t add enough layers of glue down during the demonstration so it unfortunately didn’t turn out as I had hoped however, I intend to have another go and perfect it!) We then added spirit gum around the eye brow and laid the Glatzan piece over the top and blended out the edges with a small brush loaded with acetone. If you choose to use water based spirit gum, you do have the option to stick the brow down with that as it can be removed from the brow hair easily.
Health and safety! Before using any runny substances such as Acetone near the eye – make sure you do not over load the brush as you want to prevent any drips around the eyes. Also, be sure to hold cotton pads over the eye just as a precaution (you can often asked you model to help you out with that).

DSCF0098

Next we had to use the colour correction theory to further block out the brows as you were still able to see the underlying hairs as Glatzan is quite transparent. To do this we used a combination of white and red greasepaint to create a pink rose shade that would combat the dark undertones. It is best to use rubber mask greasepaint as these are more compatible as they do not slide or move. Once the dark tones were colour corrected we then moved on to building up the natural flesh tones over the top with greasepaint and foundation (MAC studio tech).  And that is pretty much it!
If you would like to know more on colour correction theory just click the following link:
https://kathrenelizabethmakeup.wordpress.com/2012/11/12/concealing-imperfections-with-the-colour-theory-correction-method/

Tip! If you do not have access to rubber mask greasepaint – add a few drops of caster oil to your pallet to make your very own rubber mask compatible paints! 

What we learned:

  • Always make sure to flatten the brows completely before applying Glatzan or latex pieces
  • Always colour correct the area first to eliminate any dark underlying hair
  • Only colour correct the area that needs it
  • Use a gental buffing motion on top of the Glatzan
  • Always follow the pattern made for your model
  • Applying Glatzan to a orange provides a curved shape and can imitate pour texture
  • Use rubber mask paints as they will not slide around and they also last longer
  • Always remember to look at the health and safety regulations before experimenting
  • And finally.. Practice makes perfect!

Evaluation / Reflection:
Although this was an unsuccessful attempt I now feel more confident to work with Glatzan again. I intend to experiment further with the product as I really like the way it blends seamlessly into the skin. If I was to use this technique again I would most definitly practice more, I would also stick the eyebrow down flatter before applying the piece as they did raise up slightly resulting in a blistered effect. I intend to keep trying this technique until I perfect it as I feel it will be a really effective way to cover over the brows. I would also have made a smaller piece therefore I wouldn’t have to eliminate the feathered out edges by cutting them down in order for them to fit better. Overall I think this task has been a really good learning curb which has encouraged me to experiment with more materials in my kit.

Let my know if you have any questions!
Thanks for visiting! 

Katy x 

Face Casting Part 3 – Sculpting and Casting a Silicone Prosthetic

Hi guys! If you missed the previous posts and are interested in looking at the process from start to finish just click the following links!
Part 1 of the tutorial https://kathrenelizabethmakeup.wordpress.com/2013/09/29/face-casting/
Part 2 of the tutorial:  https://kathrenelizabethmakeup.wordpress.com/2013/10/10/face-casting-part-2/

ImageSculpt Inspiration:
I really had no idea what I wanted to sculpt at first so to help inspire my sculpt I looked at several different sources in the hopes of finalising my ideas. I first started looking at some of my favourite make-up such as Greg Nicoteros’ zombies from the popular series ‘The Walking Dead’. I then looked at the make-up from the films ‘The Decent’ and of course ‘The Lord Of The Rings’. Although these make-ups are very different I think they could motivate me to experiment with different colours, textures and most of all help me think of ways in which I could distort the facial features to create something quite scary.
My final sources of research played the largest part of my design. With it being almost Halloween there are several classic images popping up all over the internet such as the classic Frankenstein make-ups from the film ‘Mary Shelley’s Frankenstein’ (1994). I have always been a huge horror movie fan and this is one of my favourites to watch around Halloween! I have also been inspired by the new make-up range by MAC and Rick Baker which has a ‘Frankenstein’s bride’ Make-up as an advertisement. However this is a little too pretty for my liking!
A million mind maps later.. I had finally decided on my concept. I wanted to create a Frankenstein inspired being that has an immortal soul and needs to constantly repair their body in order to live their eternal live in comfort.  The character will go to extreme lengths to find the vital parts it needs to replace it’s suffering organs. Murder is almost always the solution.
So I began sculpting! The material I used was Plasterline which I found really difficult to work with at first. It did get easier the warmer it was and the more I practiced. I didn’t want to sculpt in any stitches as I wanted to add them in at a later stage. I want to experiment with stitching into the silicon prosthetic before applying it to my model. Fingers crossed it will work!

Making a Silicone Prosthetic

Products/ Tools needed:

  • X2 strips of Mod rock
  • Petroleum jelly
  • Plaster
  • X2, 12″ by 12″ of Scrim
  • X3 Mixing bowl
  • Access to water
  • Chisel
  • Flat wooden board
  • Silicone part A, B and a accelerate
  • Weighing sales
  • 1/2 inch paint brushes
  • Paper towel

kathren elizabeth makeupWe first began by building a clay wall similarly to before however this time it was twice as tall. We also added a layer of Mod-Roc to provide more strength. Once the wall was complete we then used a cheap 1/2inch brush to paste a thin layer of petroleum jelly all over the exposed plaster on the face cast base. This step makes it easier to separate the top and the bottom part of the mould. I also used some left over clay to fill in any parts of the cast that may catch on the top of the mould.
kathrenelizabethmakeupWe then mixed up a batch a plaster and added a beauty coat over the top of the sculpture. This is to ensure we get a good coverage of the full sculpt. As we had previously applied a light greasy layer of petroleum jelly the plaster repelled at first but it did cover eventually.
scrim combo We then added poured a little more plaster onto the cast and allowed it to dry for a few minutes. We then added a layer of scrim over the top and added more plaster on top. In total we added two layers to add strength.
2013-10-21 10.37.35We then poured some more plaster over the top to ensure none of the scrim was visible. We then left it to dry for 1 hour to ensure it was fully set.
2013-10-21 12.06.04Once set we removed the clay and Mod-Roc wall and gently filed away any rough edges of the plaster with a metal file. This is not only for neatness by for health and safety reasons.
chisel comboWe then used a chisel to gently prise open the two parts. KathrenElizabethMake-upFaceCasting (32)

Next step was to clean out any of the Plasterline. A really helpful trick Martin showed me was to use a piece of left over scrim to rub away any of the Plasterline that was taking forever to come away from the cast.  I then left the white top part of the cast to soak in water for around 10 minutes. This is so the silicone doesn’t absorb into the open pours of the plaster. once soaked I then patted it dry ready for the next step

KathrenElizabethMake-upFaceCasting (31)

I then applied a very light coat of petroleum jelly to act as a releasing agent.

Mixing Silicone 
KathrenElizabethMake-upFaceCasting (35)As this has to be done quickly it is always best to have everything you need lay out ready to start. This can be quite sticky so we opted to put on disposable rubber gloves just for easiness.

PArt one of combinations page

  • Place the empty plastic bowl onto the scales making sure it is still on 0 (This is so we don’t include the weight of the bowl as the -measurements have to be accurate in order to get a good batch of silicon)
  • Add 500grams of part A of the rubber silicone
  • Add 50grams of part B (Silicone catalyst)
  • Add Desired silicone colour a little at a time

part two of page combination

  • Mix the pigment in thoroughly to ensure an even colour throughout the silicone
  • Add 5grams of the accelerant. This allows the silicone to set much quicker cutting the waiting time down dramatically.
  • Mix well
  • Once mixed thoroughly then pour into the top part of the mould

part 3 of combo

  • Once you are happy with the desired about of silicone immediately sandwich the two parts of the moulds together using the drilled dents as a guide to line it up correctly. You may need to use a clamp at this stage to tighten the two parts together.
  • Allow any excess silicone to drain out. This is a good sign, it shows that the mould is completely filled.
  • Then leave to dry completely for around 30-45 minutes. A good way to tell if it is complete set is to pour a small mount of silicone on the top of the moulds as this will act as a visible guide.

aaaaaaaaaaaaaaaOnce the silicone was completely dry we then used a chisel to gently prise open the mould to reveal our silicone prosthetic. The next stages will be cutting it down to size, applying and painting. Can’t wait!

Thanks for visiting my blog 😀 

Katy x

Reflections / Evaluation:
Overall I enjoyed this part of the process, I felt like I had a really productive day in the studio. At first I was a little stuck for idea’s but carrying out the research really helped me. I now feel confident in my concept and sculpting abilities after having the chance to practice with the Plasterline at home before sculpting my final design.
I didn’t particularly find the casting process difficult as Martin  walked us all through it step by step which gives me a chance to see how it should be done and allows me to make plenty of notes for future reference.
If I was to mix up another batch of silicone I would perhaps like to mix some different colours together to see what I could come up with. I am however extremely happy with the first attempt of creating a fleshy toned prosthetic. I am a little nervous about the cutting, blending and applying the prosthetic as I have never worked with silicone before. I am also unsure how to go about pointing the piece as I want to do the best I possibly can and not ruin my sculpt with a dodgy paint job. As we have made two casts today I will get the opportunity to have a practice run at painting and applying which puts me at ease a little.

Second year? Bring it on!

Hi guys! I just started my second semester of college this week so you know what that means?! More blogging! 🙂  

This year I’m going to be writing detailed tutorials and product reviews followed by mini evaluations. This will allow me to reflect on what worked well and what didn’t – so you too can learn from my silly mistakes! I’m also going to set myself a goal of posting at least twice a week to keep everything up to date for you all. 

Yesterday we had the chance to be taught by a master of life casting who is currently working in the industry, which was really exciting for us all! Stay tuned to see what we all got up to in the special effects studio!

Thanks for reading,

Katy x

80’s Street Urchin Fashion Look


ImageProducts used


Face:
Illamasqua Satin Primer – Buffed into cleansed and tones skin
MAC face and body C1 – apply lightly all over face and blend onto neck and ears
15 Concealer Palette – Subtly apply under eyes and conceal imperfections
MAC Bronzer – Contour the cheeks and temples, under the jaw and down the nose to make the face more angular.
Virgin Vie powder pigment (White) – Apply to the top of the dark contour to create contrast
Illamasqua Gleam (Arora) – Dab onto the top of the cheek bones with fingers
Illamasqua Translucent Powder – Press onto skin using powder puff, staying clear of the Gleam.


Eyebrows:
Cleans and tone eyebrows to remove any grease or make-up to allow the Pritt stick to adhere to the skin better.
Apply 3-4 coats of Pritt stick to the brows powdering in between each layer.
Kryolan Greasepaint (mixture of red and white) – create a rose coloured paint and cover brows to colour correct any grey or blue tones coming through the glue. Then apply a matching skin colour over the rose tinted brows to blend with the natural skin tones.


Eyes:
Benefit Stay Don’t Stray – Applied evenly all over lids
MAC eye shadows:
Orb – Dust lightly over lid with blending brush
Virgin Vie Eye shadow (black) – Pat onto lids to create a block colour then blend outwards and under eyes with a fluffy blending brush. 
Hold a strip of sequin waste over the eyes and apply Kryolan Greasepaint to create a spotted dark pattern.
Mac Gel Liner (Black track)- Apply thin line onto upper lash line to further define the eyes
Maybelline Mascara (black)  – Apply to upper and lower lashes to define lashes


Lips:
Barry M (Black)- Line the natural lip line and fill in to create depth
Kryolan Greasepaint (Black)– Apply to the lips using ring finger to create a slight gloss to the lips.

Image


Overall Evaluation:
During my research into historical eras I had decided I wanted to base my fashion assessment on the 1980’s as I felt I could easily transform it into an edgy high fashion catwalk look. I began by looking into the historically correct 1980’s make-up and hair and the products they used to create the typical 80’s look. I then looked into the key fashion trends at the time to help inspire my costume ideas for the final look. To gather more inspiration to try and bring my look up to date I looked into other peoples modern interpretations of the 1980’s look to help inspire me. I created mood boards on each of these aspects as part of my design process as this is a good way of putting all the information together so I can analyse it and eventually generating my own interpretation of the 1980’s as it only has to be inspired by the 1980’s and not look exactly like the typical 80’s style.

For the design process I experimented on myself at home along with creating different face charts as another way of showing my ideas. This was a key part of my design process as it allows me to be creative and get a better understanding of what is going to look good overall.  I wanted to create an extremely strong look which would be ideal for catwalk so I decided to stick with my final design which consisted of a dark smokey winged eye and a harsh black glossy lip. I also wanted to highlight and contour my models natural face shape to make her look even more striking from a distance. The dark eye was largely inspired by the 1980’s use of heavy eyeliner in winged shapes which was a very popular style at the time.  This look was also inspired by the present popular catwalk looks, as I had noticed that a lot of designers were requesting that their models have their eyebrows either bleached or covered which makes the face look really edgy and different as eyebrows are a key part of framing the face. This was the first time I had covered eyebrows as part of an assessment and I am extremely happy with how they turned out as the colour correction theory I used made it easier to combat the blue tones of the hair under the glue.

On application day I was surprisingly calm as I knew exactly what I needed to do in order to execute my final look well I first wrapped my models hair make it as flat to the head as possible so the wig would fit on perfectly. Once I was happy with the hair wrap I further flattened the hair down with hairspray to prevent fly away hairs from falling down the face as these would be visible on camera. The application of the make-up went quite well as I had previously practiced this look a few times at home to ensure I was confident in my methods. After the make-up was set and complete I then went onto applying MAC face and body to my models legs and chest to make her skin look flawless and glowing so it wold pick up well on camera. I finally dressed my model and applied the wig and pinned it into place to ensure it was secure throughout the photo-shoot. 

Thanks for reading 🙂 

Katy x


Photoshop Image Editing – Changing Background Colour, Brightening Eyes, Smoothing Skin and Whitening Teeth

Hey! From my last work based learning lesson we were taught some great new editing skills which I thought I’d blog about because I found them extremely useful. I did struggle with this in lesson but I did get there eventually! I made lots of notes throughout lesson but even then I struggled to follow them when I read over them again so forgive me if this isn’t the clearest of tutorials.  If you have any questions just ask and I’ll see if I can be of any help to you. Here we go..

britney bad skin-horz

(Original image source-http://mainstreampsychiatry.wordpress.com/category/celebrities-celebrities/)

First I began by removing any blemished or imperfections on the skin by using the clone and patch tool. This tool is also useful for removing glitter fall out which is common problem. The cloning tool takes part of the picture in which you have chosen and patches over it with that chosen part of the image creating a realistic cover-up of an mistake, spot, wrinkle or stray hair.

britney good skin

To smooth out the skin I then duplicated the layer and applied a Gaussian blur filter. Then duplicated the layer again to darken and then  change the capacity to around 35%. Then I merged the layers and inverted then by pressing control. I next changed the capacity again to around 40%. Finally I used the brush to paint over the flat areas of the skin to add the blur to the image to hide any imperfections such as shine and the texture of the skin. I made sure not to go overboard with the bluring as it can distort the image too much if key features of the face are blurred too much. Once I was totally happy with the look of the skin I then could continue to play around with the image to see what else I could do to improve the image.

I also wanted to brighten the eyes and whiten the teeth ever so slightly for this I used a similar method which also consisted of duplicating layers adding filters inverting them and then painting over the layers to reveal parts of the filter. I also used this method for adding a more pinky toned lip colour.

final images edited

I also made the hair look a lot thicker by using the clone tool which made a huge difference to the image!

original image-horz

To change the background of this image I used a very similar technique however I experimented with the hue and saturation in order to brighten up the background to make the image more appealing. I think this is a great technique to use as it make the woman in the picture stand out as the blue hue in the background is complementary to her ginger hair. I also edited this image using the same methods as above.

I’m so pleased with the result and I think these techniques will help me a lot in the industry for example I will be able to perfect my images for my portfolio. However I do believe using too much Photoshop is an easy option! So I do try to use it little as possible as I feel like I’m cheating a little haha!  Although I have been taught these methods on my course I do think airbrushing images has become a huge problem in the industry as it is creating an impossible polished image of the human body which is near enough impossible to obtain

Thanks for reading!

Katy x

Grecian Theater Hair (Practice)

Grecian hair practice

For part of my media assignment I needed to create a theatrical historic look. I decided to choose a Grecian theme as I am a big fan of the Ancient Greek look as I think the hair looked beautiful along with the fashion which is still present in recent trends such as the Grecian style maxi dresses you tend to get in summer. I decided to have a play around with hair pieces to give the hair some more height as my look had to be suitable for theater so it had to be more exaggerated than a normal TV look.

Bex (my beautiful model) Naturally has shoulder length thick hair so I want to add more length to her hair so I decided to add a hair piece.

small grecian hairpiece

I have never worked with a hair piece before so this was purely experimental. The hair piece consisted of a long weft of hair that had been wound round and stitched to secure it also had a hair clip already attached however more hair grips will be needed to secure the hair piece to the head.

I first set Bex’s hair in rollers to see a detailed tutorial of how to do this just click the following link:
https://kathrenelizabethmakeup.wordpress.com/2013/03/08/setting-hair-heated-rollers/

Grecian hair practice media hair

The only difference with hair set was the direction of the rollers on the front of the head as I wanted to create a tighter curl which I could then pull back to give a twisted effect on the front of the head. Once the rollers were cool I could then begin to dress the hair into the desired style. Bex’s hair had taken extremely well to the rollers so that made my job that little bit easier! The more you do a heated roller set the more you get an understanding of how much product to use to maintain that curl for as long as possible.

For the first part of the up do I tied up the back half of Bex’s hair to pull it up from the neck and up towards the top of the head as I need to give height to the hair. I then positioned the hair piece above the pony tail and secured the U clips. As the hair piece was straight at the time i decided to do a series of pin curls to give a curlier look as wavy or curly hair was favored by Grecian people. I then pulled back the curls at the front of the head and pin curled them to make the up-do even more curly looking.

I then two strips of gold ribbon around the head to make it look that little bit more Grecian.

Grecian hair practice media hair

Overall I am very happy with this trial run as I now know what I need to do to improve on the look for example pre-curl the hairpiece to make it easier to pin curl. Also I think it would look a lot better if the hair hanging down at the back had a slight curl to it too. If I was to do this hair style again on a model with longer hair I may not even use a hair piece as it may be possible to use the models own hair to create the needed volume the hair. During this trial run I have learned which hair set I need to use in order to get the desired curl as heated rollers are the perfect size to create volume as well as give the hair a looser curl that heat sticks.

I’ll be doing a post on the wet set pin curls I will do on the hair piece to improve this Grecian look soon. Wish me luck!

Thanks for reading!

Katy x

Colour Vue Contact Lenses Review

Image

The contacts I used  for the Hospital Zombie costume were called Bloodshot by a company called Colour Vue which I bought through amazon.co.uk
I’ve bought and tested lenses from several different companies and found that Colour Vue are the best. They don’t irritate my eyes and they are comfortable enough to wear all night, I almost forget I have them in!
I strongly recommend them!

katy xx