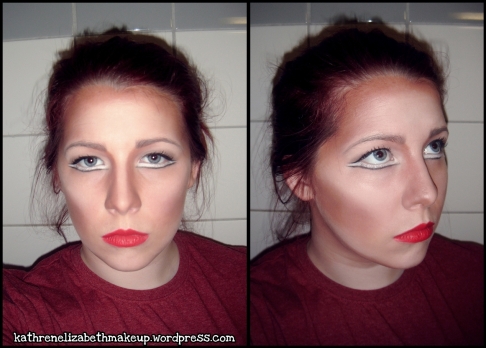
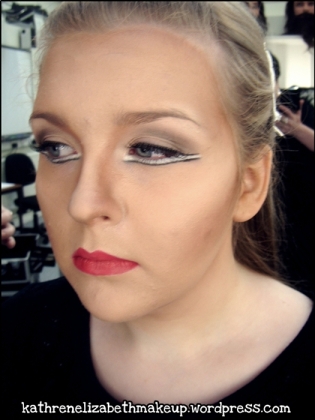
Theatre make-up often includes heavy contouring especially when it comes to large theatre as the facial features need to be defined in order for the audience to see the actor/actress’ facial features during the performance. Darker grease paints such as deep browns are often used to sharpen the facial features for example the nose can be shortened and defined by contouring down either side of the bridge to make it appear thinner, also the tip of the nose can be shaded to be reshaped or shorted. Applying the same dark shade under the cheekbones is also a very effective use of contouring as it can define the cheekbones dramatically.
Highlighting is also a key part of creating the perfect theatre contour look as it further highlights the facial features making the face sharper and brighter for example; the eyebrows can be defined by adding a lighter toned greasepaint to the brow bone and on top of the eye brow creating a contrast against the darkness of the brow.
Contouring
I first began by cleansing, toning and moisturising the skin.
(For more detail on cleansing, toning and moisturising click the following link -https://kathrenelizabethmakeup.wordpress.com/2012/10/19/cleansing-toning-and-moisturising/). Next I used Illamasqua matte primer which I buffed into the skin with a medium sized buffing brush, this step is very important as it prevents the make-up from moving or melting during the performance.
I then carried out a colour swatch on my clients jaw line to determine which colour foundation would be best for her skin tone. However I would not be looking for an exact match as I want to go at least 2-3 shades darker to make the face a warmer shade as the stage lighting tends to bleach out colour significantly. I used Maxfactor Pan stick in cool copper which I purchased from an independent make-up stand for around £4-£5, Bargin! Pan stick make-up is much thicker than regular foundation and gives great coverage so I skipped using concealer as the coverage was decent already.
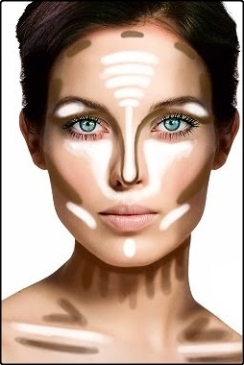
There are products you could use to create heavy large theatre contouring such as darker foundations, cream concealer colour correctors, powders and greasepaints. I used greasepaint for this look as I felt it give me a good depth of colour and was really easy to blend. I used a dark brown Kryolan greasepaint and a flat foundation brush to draw dark lines similar to the image below.
(Contouring image source http://blog.womenshealthmag.com)
I then used a flat foundation brush to blend out the harsh lines to leave behind a dark contour. Some people prefer to use a buffing brush to blend however, I like to work with a foundation brush and work the product in the opposite direction to illuminate the harsh line. Once I was happy with the blending of the brown greasepaint I then moved onto a lighter colour to add highlights to the face to help brighten up the skin and bring out the darker contouring that I had just created. Again I blended the lighter greasepaint into the skin so the harsh lines were less visible.
Eyes
First I began by covering the lid with Benefit’s Stay Don’t Stray (which is amazing by the way) this stops the makeup from moving and also creates a great base for the eye shadows to stick to. You could also use a concealer if you don’t have an eye base handy. I first applied MAC eye shadow in the colour Orb all other the lid which brightens up they eye. I next added both MAC Era and Concrete into the crease of the lid to give definition to the eye. I made sure to blend each colour with a fluffy brush as I went along.
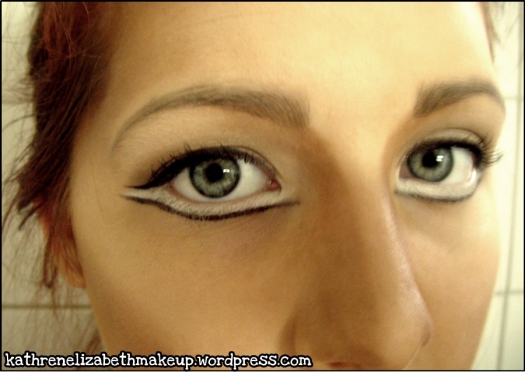
Next I used a white greasepaint (from the Kryolan B Pallet) to paint on a line under the eye to make the eye appear larger. To define the white line I next used Maybelline black liquid eye liner and a small angled brush to create a thin black line to recreate the lower lash line. I extended the line out to make the eye appear larger. I made sure the liner was a smooth curve and not the typical cat eyed flicked liner. I then carried liner the upper lash line following the same extended shape.
Finally filled in my eyebrows with a darker brown pencil to give the face more definition. I then added a few layers of Maybelline Colossal Lash to the top lashes to complete the eye make-up. False lashes could also be applied to make the look a little more dramatic.
Lips
For lips I firstly followed the natural lip line with MAC cherry lip liner before filling in the lips with a W7 burgundy red lip stick which I applied with an angled lip brush.
Thats it! Thanks for reading 🙂
Katy xx


