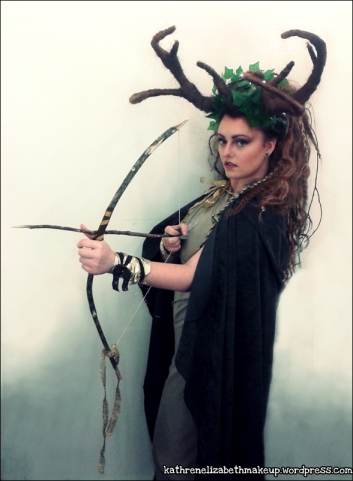
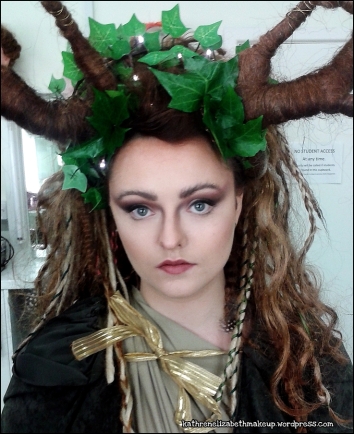
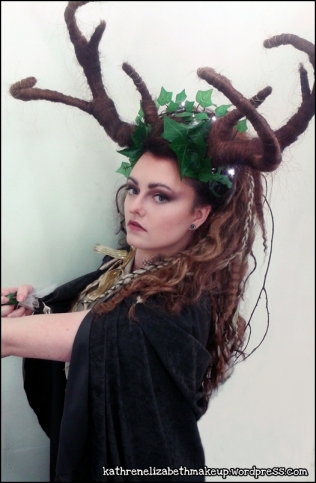
Hi guys! So, I thought I’d do a post on one of my more recent university assessments. This semester we were asked to do a create hair character piece. I really enjoyed putting it together although it felt like it took me forever! Here is some images and info about the look. Enjoy! 
For the task three creative hair assessment I had chosen to look into Greek mythology. I based my look around one Goddess in particular, Artemis – ‘the Goddess of the hunt’. I studied several aspects of the character; how she is commonly depicted, what she symbolises, how she is interpreted in mythological stories and her sacred symbols. All this research helped me build up to my final design. I had based my look on the mythical story of Artemis and Actaeon. Actaeon was caught spying on the virgin Goddess Artemis whilst she was bathing. Furious, Artemis punished Actaeon by turning him into a stag and turning his own hunting dogs against him. I liked the idea of Artemis taking the antlers from Actaeon body and mounted them upon her head as a trophy. To interpret them into the hair I wanted it look like her natural hair had gradually grown around the antlers entwining with her hair. As for the rest of the hair I had bounced back and forth from different ideas but eventually come to a decision of making the hair look as natural and earthy as possible; incorporating dreadlocks, braids, and matted textured hair. To blend all these aspects together I wanted to incorporate foliage to keep it natural and earthy looking. Another idea I was unsure about what of how I was going to incorporate ‘the Goddess of light’ aspect to my final design. I stumbled across some foliage which had little LED lights entwined through it. I was worried that it was going to look too festive and out of place however when I tried it out on myself I really liked the effect. Also I thought it would be good for a theatrical performance as it would be really interesting on stage.
For the make-up I wanted to create something strong yet graceful and natural. I decided to emphasis the eyes to highlight her fierce eyes as she stalks her prey whilst hunting. As my look was for theatre I wanted to take what I had learned from the first year and do a full coverage and a heavy contour, making the facial features stand out. As for the colours I wanted to stick the earthy colour scheme so I decided to use a mauve colour alongside a deep burgundy to compliment the green in the costume and hair.
I wanted to make a full costume for my character to complete the look. I visited the local fabric shop and bought two meters of cream fabric to make a wraparound Grecian style dress and two meters of thick earthy green fabric to make into a cloak. I looked at several tutorials to figure out how to stitch it together as best I could. I was really pleased with how the costume came out as I feel the fabrics were suited to my design. I also wanted to make a bow and arrow prop as the one I had ordered online was not suitable for my character as it looked to cartoon like so I made my own from sticks and parcel sting. I also used left over straps of fabric to act as the riser it also makes the bow look more decorative. I thought the prop worked really well as it give my model something to work with on the shoot.
On the day of assessment I was fully prepped and ready to put my look together as I had had a few dress rehearsals at home. I first began by braiding the two sides of the hair and pulling the rest of the hair back to keep it out of the way whilst I was doing the make-up. The application of the make-up went really well as I was extremely pleased with it. However I did struggle on the lip colour as the product I had practiced with did not suit my model so I had to improvise and I was not entirely happy with the shade I had chosen. I would perhaps use a plump shade as opposed to a pink however this may clash with the eye make-up.
As for the head piece I found it harder to secure it onto my model although I had made the size of the head piece adjustable to allow it to fit properly. I would like to have used stronger wire to make the antlers more stable as they moved when my model shook her head although they were secured onto her head well they still had too much movement for my liking.
I received positive feedback however I need to work on choosing a lip colour to fit my design. Also I think I should have tried to disguise the plastic foliage with natural leaves to try and make it less fake looking however, fake foliage would most likely be used in theatre for easiness as it can be reused and stays the same which is good for continuity. I did try doing the look with dead autumn coloured leaves however it looked too bland so I think the green adds the pop of colour it needed. Overall I am pleased with how my final look come together as I was happy with the overall look; hair, make-up, props and costume. I managed my time well as it took me exactly two hours to complete the look and was on time for my photo-shoot slot.
Products used (Make-up):
Face:
Illamasqua Matte Primer – Buffed into cleansed and tones skin
MAC studio tech NC15– Buffed into the skin to warm up the skin tone a considerable amount this product also gives a full coverage flawless cover.
Kryolan Greasepaint supra color pallet (7W, Ng1, NG2) – Apply a dark brown to create a heavy contour down the side of the nose under the chin, cheek bones and jaw and blend into the neck. Also work a little of dark brown under the tip of the nose and into the temples and around the forehead to give the face definition.
Kryolan Greasepaint supra color pallet (1W, 3W)– Light peachy tones to use as highlighter on the top of the cheeks and jaw line, across the forehead down the nose and on the chin. Emphasis the eyebrows by using a lighter tone above the outer part of the brow and on the brow bone.
No 7 blusher (Coral Flush) – Apply small amount on top of the dark contour with a fluffy blush brush
Illamasqua gleam (Aurora) – Buff a small amount onto the tops of the cheekbones
Illamasqua Translucent Powder – Press onto skin using powder puff
Eyes:
Benefit Stay Don’t Stray- Apply evenly all over lid as a base
MAC orb – Apply all over the lid with flat fluffy brush to brighten up the eye
MAC Embark – pat onto the crease and blend out with fluffy brush. Bring the product down the side of the nose and out into the temple to create a winged eye effect. Add more if needed to darken the eyes further.
Body shop Iced body powder (apricot) – Apply under the inner corners of the eyes
No7 eye shadow (weatsheaf) apply to centre of the lid and in the inner corners of the eyes to open them uo
Barry M eyeliner cream – apply to lower waterline
Maybelline Colossal Lash (Black) Apply to upper and lash lines
Brows:
Use a spooly to brush the natural brows upwards. Then apply a clear mascara to keep the hairs in place. Once happy with the placement of the brows fill in with colour suitable for model I intend to use MAC eye shadows in Era and Concrete.
Lips:
MAC Lip liner (whirl) – define lips up to the natural lip line
Benefit (nice knickers) apply to the centre of lips
Thanks for visiting my blog! Merry Christmas!
Katy x

